How to Trigger Routines at Sunrise/Sunset on Google Assistant |
- How to Trigger Routines at Sunrise/Sunset on Google Assistant
- How to Launch Google Assistant by Tapping the Back of Your Phone
- How to Set Different Light and Dark Mode Wallpapers in WhatsApp
- How to Open and Read a PDF on Android
- How to Change Microsoft Office’s Default Save Location on Windows 10
| How to Trigger Routines at Sunrise/Sunset on Google Assistant Posted: 23 Dec 2020 05:55 AM PST
Routines is a powerful automation feature in the Google Home app. They make it easy to run multiple Google Assistant commands together. You can even initiate these routines with sunrise and sunset times. We'll show you how. There are several ways to launch a Google Assistant routine. You can use your voice to recite a command, choose a specific time, or use the dynamic times of sunrise and sunset. The latter is especially handy to automate lights, but it can be used for many other actions. To get started, you'll need the Google Home app for iPhone, iPad, or Android. Open the app and select "Routines" at the top of the main screen.
Next, tap the floating "+" button to start creating a new routine.
First, we'll need to decide how to trigger the routine. This is where sunrise and sunset will come in. Tap "Add Starter."
Now we can select "Sunrise/Sunset."
Choose whether you want the routine to start at "Sunrise" or "Sunset."
In order for Google to know when sunrise and sunset occur, you'll need to first choose your location.
You'll be able to choose from your saved locations or enter a new one. Tap "Done" when you've made the selection.
Next, you can decide how exactly to use the sunrise/sunset time. Select "When the Sun Sets/Rises."
Then choose one of the times based around sunrise or sunset from the list and select "Done."
The next thing to do is decide which days the routine will run on. Tap the days to select them.
Lastly, you can choose a device if your routine will include an audio element, and you'll get notified when the routine starts. Tap "Done" when you're happy with all your choices.
At the time of writing, Google requires a voice command to be associated with every routine. You don't have to use it, but one needs to be entered. This is also what the name of the routine will be. Tap "Add Voice Starter."
Enter a command phrase and tap "Done."
Now we can decide what will happen when the sunrise/sunset time occurs. Tap "Add Action" to get started.
You'll see a list of categories that include a variety of different actions to choose from. Tap one of the categories and select any actions that you'd like to use.
If the categories don't fit your needs, you can select "Try Adding Your Own" and manually enter any command you would normally give to Google Assistant.
Add as many actions as you'd like and tap "Save" when you're finished.
The Google Assistant routine is now ready to run at the time you selected. As sunrise and sunset times change throughout the year, so will the start time of your routine! |
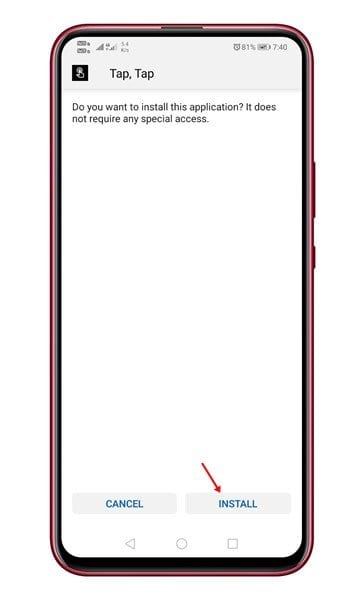
| How to Launch Google Assistant by Tapping the Back of Your Phone Posted: 22 Dec 2020 03:21 PM PST If you have ever used iOS 14, you might be well aware of the 'Back Tap' feature. It's an iOS exclusive feature that allows users to take a screenshot just by tapping the smartphone's back. A similar feature is also seen on the latest Android 11 operating system. The back tap feature of Android 11 offers more options. For instance, you can tap on your Android phone's back to control media playback, open the phone's camera, etc. Although the back tap feature is only available on Android 11, that doesn't mean the older Android version can't have this feature. Also Read: How to Capture Screenshots On Android using Google Assistant Launch Google Assistant by Tapping the Back of Your PhoneYou can install an Android app known as 'Tap, Tap' to launch Google Assistant on your device. In this article, we will share a detailed guide on how to launch Google Assistant by tapping the back of your Android. Let's check out. Step 1. First of all, visit the XDA Forum and download the Tap, Tap Android app. Step 2. Once done, open the installation file and tap on the 'Install' button.
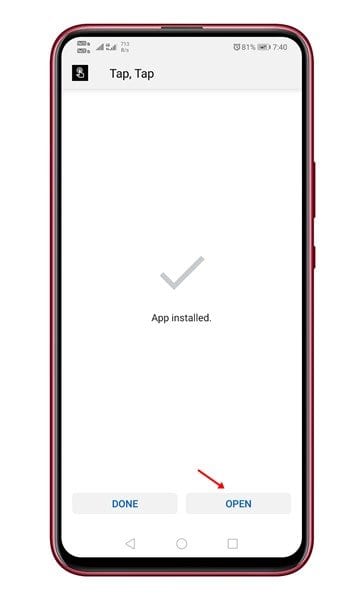
Step 3. On the next page, tap on the 'Open' button.
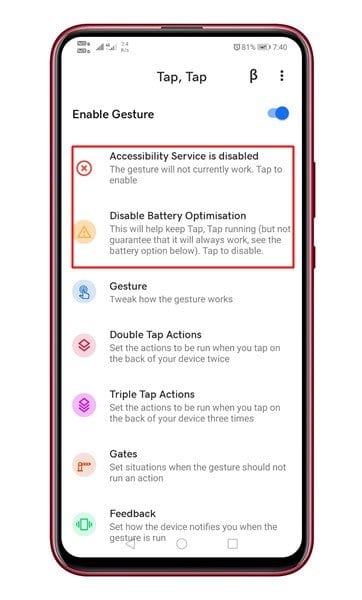
Step 4. Now you will see the main interface of the app. Grant all permissions that the app asks for.
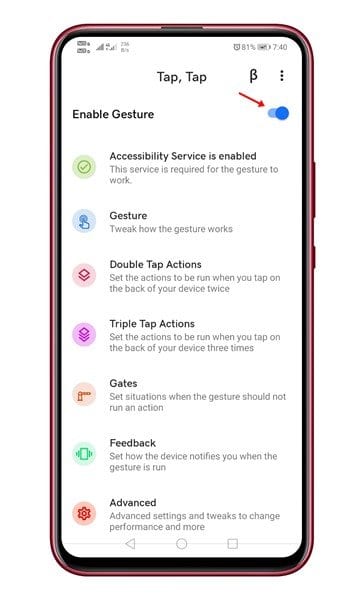
Step 5. Now turn on the 'Enable Gesture' option.
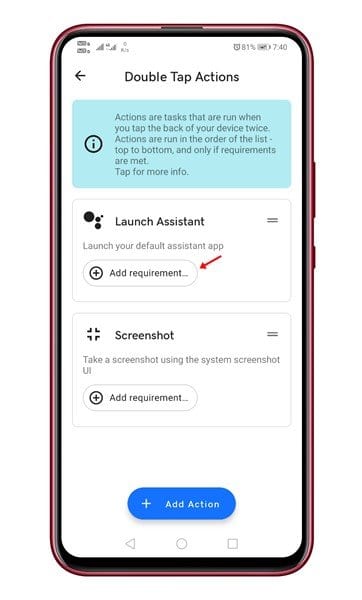
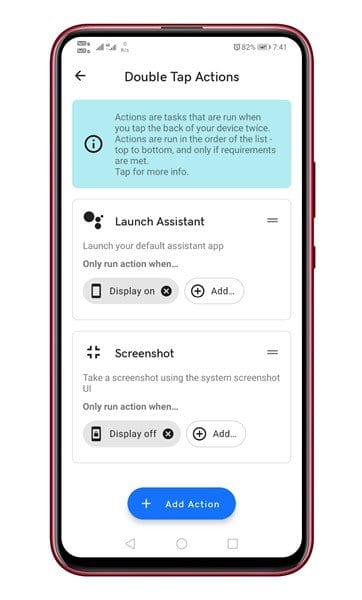
Step 6. Next, tap on the 'Double-Tap actions'
Step 7. Under the 'Launch Assistant' tap on the 'Add Requirements'
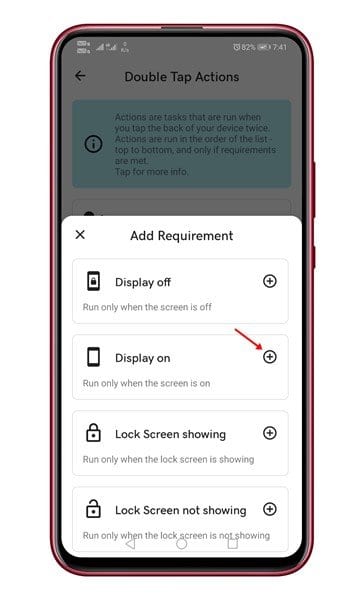
Step 8. Next, select the option 'Display On'
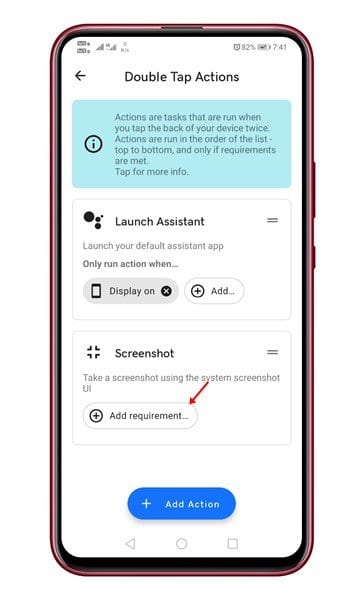
Step 9. Now go back to the previous page and tap on the 'Add Requirement' behind the Screenshot.
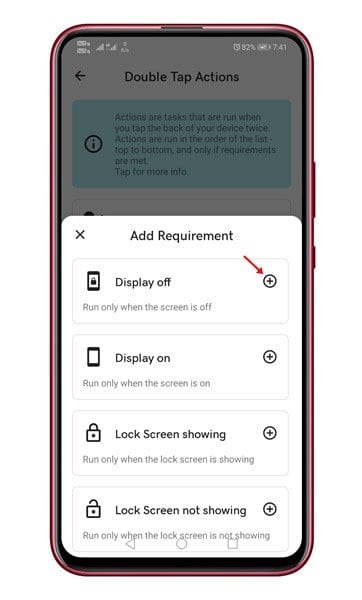
Step 10. From the Add Requirement menu, select the 'Display Off' option.
Step 11. The final result would look like this.
That's it! You are done. Now remove your phone cover and double tap on the back. It would launch the Google Assistant. This article is all about how to launch Google Assistant by tapping the back of the smartphone. I hope this article helped you! Please share it with your friends also. If you have any doubts related to this, let us know in the comment box below. |
| How to Set Different Light and Dark Mode Wallpapers in WhatsApp Posted: 22 Dec 2020 12:53 PM PST  WhatsApp can automatically change its theme based on the system-level dark mode setting on your iPhone or Android. But did you know that you can set a different chat wallpaper based on light or dark mode? You can now set two different chat wallpapers, one for light mode and another for dark mode. Oddly enough, your iPhone or Android smartphone needs to be in the particular mode (light or dark) to set the chat wallpaper to the light theme or the dark theme. How to Set Different Wallpapers in WhatsApp on AndroidOn your Android smartphone, open the WhatsApp app and tap the three-dot menu button from the top-right corner.
From the context menu, choose the "Settings" option.
Here, go to the "Chats" section.
Now, select the "Wallpaper" button.
You'll see a current preview of the wallpaper. If you're in Light mode, you'll see a light theme wallpaper at the top. Tap the "Change" option.
You can only change the wallpaper for the mode you're in. If you want to change the dark mode wallpaper, first switch to dark mode in Android. RELATED: How to Turn on Dark Mode on Android Then you can select a wallpaper from the "Bright," "Dark," "Solid Colors," or "My Photos" sections.
After selecting a photo, you'll see a preview of it. Here, tap the "Set Wallpaper" option.
When you're in dark mode, you can also use the "Wallpaper Dimming" option to dim the wallpaper's brightness.
How to Set Different Wallpapers in WhatsApp on iPhoneThe process of setting different chat wallpapers for light and dark mode on iPhone is slightly different. Open the WhatsApp app on your iPhone and go to the "Settings" tab. Here, choose the "Chats" option.
Now go to the "Chat Wallpaper" section.
If you're in light mode, you'll see a "Choose a New Wallpaper" option here.
If you're in dark mode, you'll see the "Choose Dark Mode Wallpaper" option.
From the next screen, choose from the "Bright," "Dark," or "Solid Colors" collection. If you want to choose your own photo, tap the "Photos" option.
Browse around and tap a photo to choose it.
Select the "Set" button to use it as the wallpaper for all of your chats.
You'll now see the preview in the Chat Wallpaper window. RELATED: How to Enable Dark Mode on your iPhone and iPad If you're setting up the dark mode wallpaper, you'll see a wallpaper dimming slider at the bottom. Using this, you can dim the wallpaper brightness to make it more suitable in dark mode.
Want to use WhatsApp from your computer when you're at work? Here's how to connect your WhatsApp account to your PC. |
| How to Open and Read a PDF on Android Posted: 22 Dec 2020 10:29 AM PST
Handling a PDF file on your mobile device can sometimes be a pain. The good news is simply opening a PDF is pretty easy. Your Android device can probably already do this, but if not, we'll share some options. First, there's a good chance you already have an app on your Android device that can open PDFs. Google Drive can do it, but so can e-book readers, like the Kindle app. To find out if you have an app that can open PDFs, just try to do so. Navigate to the file manager on your Android device and find a PDF file. Any apps that can open PDFs will appear as choices. RELATED: How to Find Files You Downloaded on Android Simply select one of the apps and the PDF will open.
Again, if you don't already have an app capable of opening PDFs, there are several you can choose from. The simplest is Google PDF Viewer. It's not really an app in the traditional sense, as you can't open it directly. However, it will appear as an option whenever you try to open a PDF.
Files by Google is another option. This app is a full file manager with the built-in ability to open PDF files. After you install it on your device, it will also appear as an option whenever you attempt to open a PDF. Keep in mind these apps only allow you to view PDFs. If you need a more powerful PDF tool, you'll have to install Adobe Acrobat Reader for Android, or something similar.
|
| How to Change Microsoft Office’s Default Save Location on Windows 10 Posted: 22 Dec 2020 08:16 AM PST
Saving files in Microsoft Office is a pretty painless process, but you can make it even quicker by changing the default save location to your preferred folder. Here's how to do it on Windows 10. How to Make Your PC the Default Save LocationWhen you save a new document for the first time in Office 365 or Office 2019, Office asks where you want to save it. By default, Office suggests you save documents to Microsoft OneDrive online.
You don't have to manually change the location every time you want to save a file to your PC. Luckily, you can set your PC to be the default save location. First, open an Office application and click the "File" tab.
Next, click "Options," found at the bottom of the left-hand pane.
The "Word Options" window will appear. Click the "Save" tab in the left-hand pane.
Under the "Save Documents" section, check the box next to "Save to Computer by Default."
Finally, click the "Ok" button in the bottom-right corner of the window to apply the change.
Now, the next time you save an Office file, your computer will be the default save location.
By default, Office will use your Documents folder when you save files to your computer. But you don't have to stick with that folder—you can choose a favorite folder on your PC. RELATED: How to Recover an Unsaved Microsoft Office File How to Change the Default Folder for Saved FilesIf you save to a specific folder quite often, changing the default save location to that folder can save you a little time. In an Office app, open the "Options" window by clicking File > Options. Click the "Save" tab in the "Options" window.
In the "Save Documents" section, you'll see the "Default Local File Locations" option. Click the "Browse" button next to this box.
You'll see a file browser window. Navigate to the location you would like to make as the default save location and then click the "OK" button in the bottom-right corner of the window.
Your selected location will now appear in the text box next to "Default Local File Location." Click "OK" to apply the change.
By default, Office will now save files to the folder you selected. That's your new default save path. |


| You are subscribed to email updates from My Blog. To stop receiving these emails, you may unsubscribe now. | Email delivery powered by Google |
| Google, 1600 Amphitheatre Parkway, Mountain View, CA 94043, United States | |


0 nhận xét:
Đăng nhận xét