3 Ways to Find Out What Version of an Android App You’re Running |
- 3 Ways to Find Out What Version of an Android App You’re Running
- How to Launch Google Assistant by Tapping the Back of Your Android Device
- How to Open Chrome’s Incognito Mode with a Keyboard Shortcut
- How to Unlock Your Chromebook With Your Android Phone
- How to Control Noise Cancellation on AirPods Pro With a Shortcuts Widget
- How to Uninstall a Program on Windows 10 from Command Prompt
- Intel Core i7-1185G7 vs Core i7-1165G7 Review
- How to Enable Focus Mode on Android to Avoid Distractions
- 30 Best Android Hacking Apps and Tools in 2021
- How to Easily Change Your Android Device’s Name
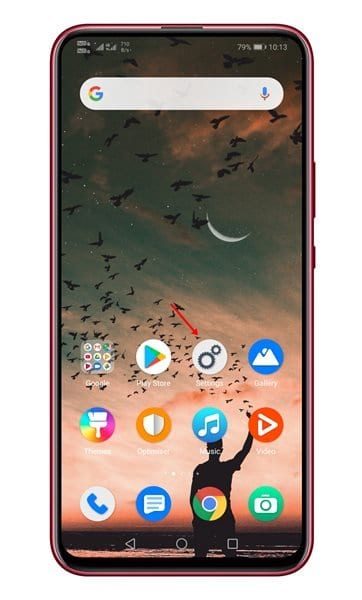
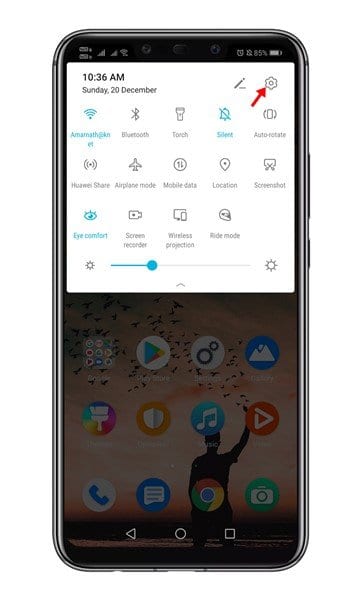
| 3 Ways to Find Out What Version of an Android App You’re Running Posted: 22 Dec 2020 12:55 AM PST Android is right now the most popular and best mobile operating system. Compared to other mobile operating systems, Android has more features and customization options. Also, the app availability is relatively high on the platform. On average, an Android user installs almost 30-40 apps on their smartphone. While installing an app, we don't care about knowing its version. However, the Android app version can tell you whether a particular feature is available or not. Also Read: How to Recover Deleted Files On Android Find Out What Version of an Android App You're RunningIf a particular app is not available on the Google Play Store, users can sideload apps from third-party stores. At that time, knowing the app version could become handy. This article will share some of the best methods to find out what version of an Android app you are using. 1. Using Android App SettingsWell, you can access the app settings to find out what version of an Android app you are using. For that, follow some of the simple steps given below. Step 1. First of all, open Settings on your Android device.
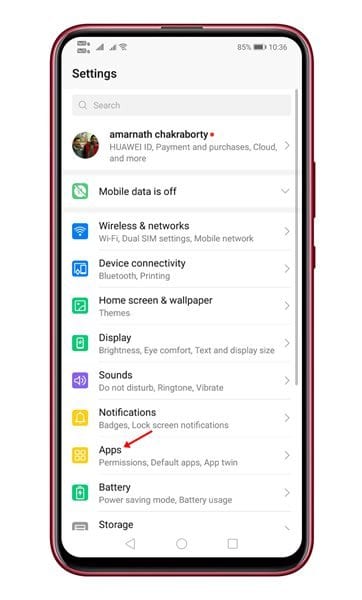
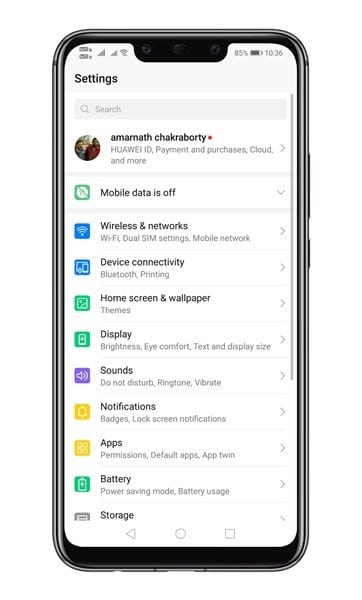
Step 2. Next, tap on the 'Apps.'
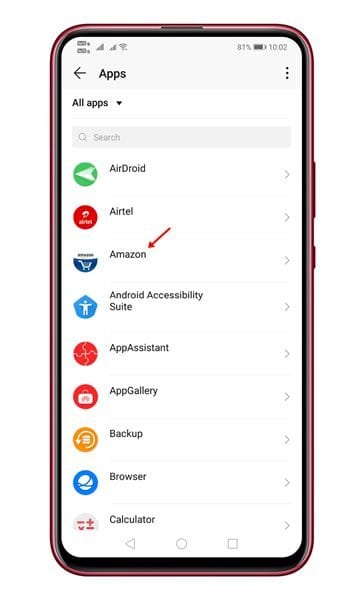
Step 3. Now you will see all the installed apps. Step 4. Here you need to select the app whose details you want to know. For example, we have chosen 'Amazon' here.'
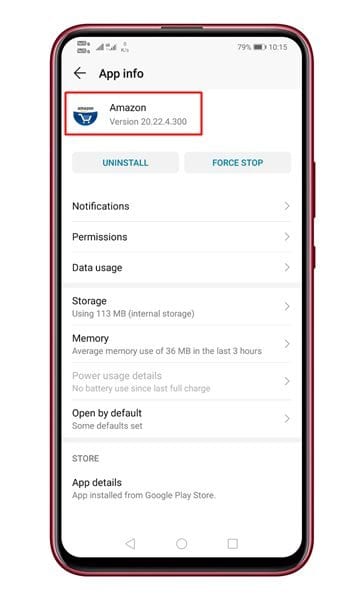
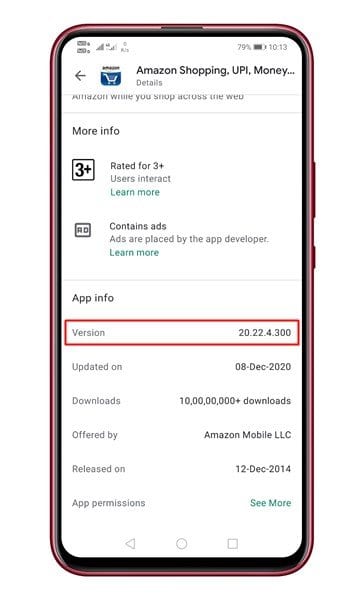
Step 5. Near the app name, you will find the version.
That's it! You are done. This is how you can find the app version from the Android settings. 2. Using The About Section of the AppThe easiest and quickest way to know the app version is by accessing the About Screen. Most of the popular apps already have an About app page. The About page will list the version information along with few other details. The About Screen is hidden somewhere in the app itself, and you need to find it. It's usually under the Settings; that is the case for Amazon, as seen below.
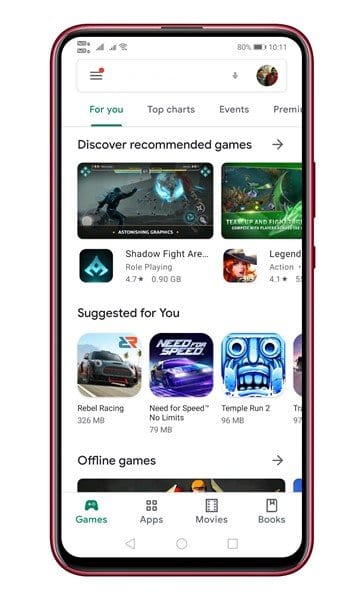
In a few apps, the option to access the About screen might different. Also, some apps don't have an About Screen. 3. Using Google Play StoreWell, Google Play Store is the third-best option to find the app version for an Installed app. Follow some of the simple steps given below. Step 1. First of all, open the Google Play Store on your Android device.
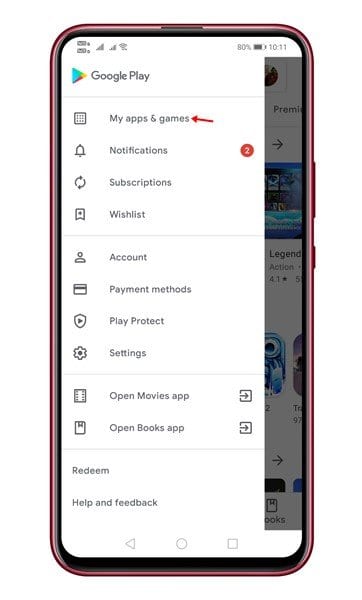
Step 2. Now tap on the menu button and select 'My apps & games'
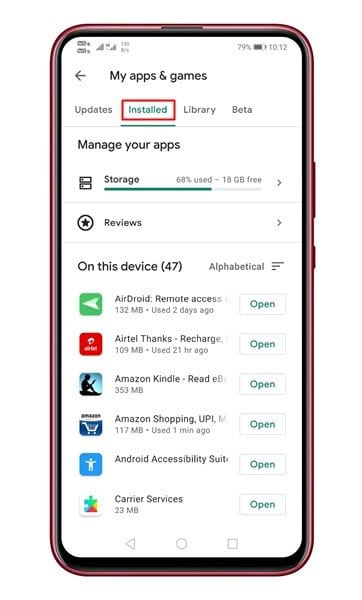
Step 3. Now select the 'Installed' tab. This will list all apps that you have installed.
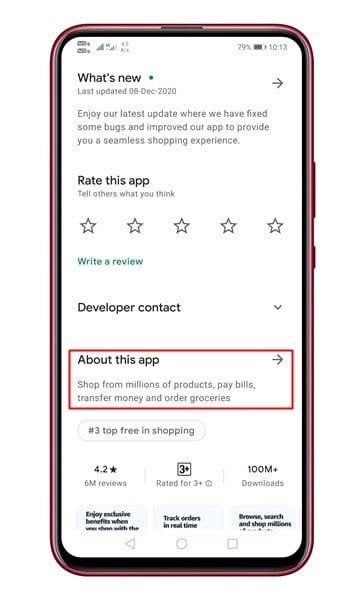
Step 4. Now select the app you are looking for – Amazon, in this example. Step 5. Scroll down and tap on the 'About this app' section.
Step 6. You will find the app information over there. It will include Version info, update status, total downloads, etc.
That's it! You are done. This is how you can find out what version of an Android app you are running. These are the few best ways to find the app version for an Installed app on Android. I hope this article helped you! Please share it with your friends also. | ||||||||||||||||||||||||||||||||||||||||||||||||||||||||||||||||||||||||
| How to Launch Google Assistant by Tapping the Back of Your Android Device Posted: 21 Dec 2020 12:01 PM PST  Android devices include a few options for launching Google Assistant. Some can be squeezed, others have physical buttons, and there are screen gestures. It's also possible to launch by tapping the back of your device. Here's how to do it. First, in order to do this, you'll need an app called "Tap, Tap." It's not available to download from the Google Play Store, but it can be easily sideloaded on any Android 7.0+ device. Before we proceed, follow our guide for getting Tap, Tap installed and ready to go. RELATED: How to Perform Actions by Tapping the Back of Your Android Phone Now that you have Tap, Tap set up, we can configure the Google Assistant gesture. Open the app and select either "Double Tap Actions" or "Triple Tap Actions." For this guide, we'll use Double Tap.
Next, select the "Add Action" button at the bottom of the screen.
From the "Launch" category, tap "Launch Assistant." This will launch the default assistant app. For the majority of people, that will be Google Assistant.
The assistant will now launch when you tap the back of the device. Next, we can add requirements that need to be met in order for the gesture to run. For example, you can set it so that the gesture will only run when the display is on. Tap "Add Requirement."
Select one of the requirements from the list.
That's it! Now you can launch Google Assistant by simply tapping the back of your device. | ||||||||||||||||||||||||||||||||||||||||||||||||||||||||||||||||||||||||
| How to Open Chrome’s Incognito Mode with a Keyboard Shortcut Posted: 21 Dec 2020 09:58 AM PST
If you ever need to do some private browsing in Google Chrome, it's easy to quickly open an Incognito window using a keyboard shortcut. In this special mode, your browsing history won't be stored on your local machine. Here's how to launch it. First, open Chrome. With any Chrome browser window open, press the following keyboard combination to open a new Incognito window:
After pressing the keyboard shortcut, a special Incognito window will open.
Whenever you're in Incognito mode, you'll be able to tell because the Chrome browser window's toolbar will have a darker color scheme and there will be a small incognito icon beside the address bar in the toolbar.
While browsing within an Incognito window, Chrome will not locally store your browsing history, site data, cookies, or saved form data once you close the Incognito window. However, downloaded files and bookmarks will be saved unless you manually remove them. At any time, you can press Ctrl+T (or Command+T on Mac) to open a new tab within the Incognito window, and browsing activity within that tab will be locally private as well. Remember that Incognito mode isn't perfect, and it doesn't protect you from those who might view your activity on the web remotely, such as your employer, school, ISP, or the websites you visit. It's only to prevent local snooping of your browsing history. RELATED: How Private Browsing Works, and Why It Doesn’t Offer Complete Privacy When you're ready to stop private browsing, you'll need to close the Incognito window. To do so using a keyboard shortcut, press Alt+F4 on Windows and Linux, or Command+Shift+W on a Mac. Or you can just click the "X" in the corner of the window with your mouse. Stay safe out there! | ||||||||||||||||||||||||||||||||||||||||||||||||||||||||||||||||||||||||
| How to Unlock Your Chromebook With Your Android Phone Posted: 21 Dec 2020 08:42 AM PST Don't want to enter your password every time you log in to your Chromebook? If you have an Android smartphone, you can unlock your computer almost instantly. Here's how to set it up. Before you can unlock your Chromebook with your Android phone, you'll first have to pair both devices. Do note, though, that this functionality is only available for phones running Android 5.1 or higher and for Chromebooks with at least the Chrome OS 71 update. For this to work, you'll also need to make sure that both your Chromebook and Android phone are signed in with the same primary Google account. Next, on your Chromebook, click the status area found in the bottom-right corner of your screen, where it shows the Wi-Fi and battery status. In the following panel, select the gear icon to enter the Settings menu.
Scroll down to the "Connected Devices" section and click the "Set Up" button next to the "Android Phone" option.
In the pop-up window, pick your Android phone from the "Select A Device" dropdown. Then, select the blue "Accept & Continue" button at the bottom.
On the next page, log in with your Google credentials. You should soon see an "All Set" confirmation window. Click "Done" to close the window.
Return to your Chromebook's Settings menu, and this time, you'll find a "Verify" option under "Connected Devices." Select this, and then unlock your Android phone if it isn't already unlocked. You should receive an alert that says that your Chromebook and Android phone are linked on both the devices.
Head back into Settings > Connected Devices on your Chromebook, and select your Android phone. Toggle the "Smart Lock" option and punch in your Chromebook's password.
Lock your Chromebook to test whether Smart Lock is active by long-pressing the dedicated button on the keyboard. As soon as you unlock your Bluetooth-enabled Android phone, the lock icon next to the password field will turn from orange to green. This means that you are authenticated. All you need to do now is click your account picture to unlock the Chromebook.
Similarly, you can access and respond to your Android phone's SMS messages on your Chromebook. | ||||||||||||||||||||||||||||||||||||||||||||||||||||||||||||||||||||||||
| How to Control Noise Cancellation on AirPods Pro With a Shortcuts Widget Posted: 21 Dec 2020 07:29 AM PST You can toggle noise canceling on AirPods Pro using the Force Sensor on the stem of the AirPods Pro, or tapping the button in Control Center. Or you can do it right from the home screen on iPhone or iPad using the Shortcuts widget. The Shortcuts widget gives you a one-tap option for enabling or disabling noise cancellation (or changing to a different noise-control mode) right from the home screen. RELATED: How to Organize Shortcuts in Folders on iPhone and iPad Shortcuts is Apple's built-in automation app for iPhone and iPad. You can use it to create simple or complex automations. In this guide, we will be creating two distinct shortcuts, one for enabling noise cancellation mode and one for disabling it. We will then add the two shortcuts to a folder and add the folder to a shortcuts widget which can be access from the home screen on iPhone and iPad.
To get started, open the "Shortcuts" app on your iPhone or iPad, and from the "My Shortcuts" tab, tap the "Plus" icon from the top-right corner of the screen.
Now, choose the "Add Action" button.
Here, search for, and add the "Set Noise Control Mode" action.
Now, tap the "Route" button.
From the list, select your AirPods Pro (make sure they are connected to your iPhone or iPad).
Next, tap the "Noise Control Mode" button.
Here, you can select the Off, Noise Cancellation, Transparency, or Ask Each Time option. As we're creating a shortcut for enabling noise cancellation mode, choose the "Noise Cancellation" option.
Now, tap the "Next" button.
Here, give your shortcut a name. You can also customize the shortcut icon. Then, tap the "Done" button.
Your shortcut will be saved. Now we'll create another shortcut for disabling noise cancellation mode. And that can be done quite easily using the duplicate shortcuts feature. Tap and hold the shortcut we just created and choose the "Duplicate" option.
Now, tap the "Noise Cancellation" button.
From the popup, select the "Off" option.
Then, tap the "Menu" button from the top.
Here, change the name of the shortcut and select the "Done" button.
Now that we have created both shortcuts, it's time to add them to the home screen. We can do this using the Shortcuts widget that's available for devices running iOS 14, iPadOS 14, and higher. First, we'll add both shortcuts to a new folder. To do this, tap the "Select" button from the top of the My Shortcuts tab.
After selecting both shortcuts, tap the "Move" button.
Here, select the "New Folder" option.
Give the folder a name and choose the "Add" option.
Now that the folder is created, it's time to add the shortcuts to your home screen. Navigate to your home screen and tap and hold the empty part of the home screen. Then, tap the "Plus" button from the top-left corner of the screen.
Here, choose the "Shortcuts" app.
Go to the medium-sized widget and tap the "Add Widget" button.
Once the widget is added to the home screen, tap it.
Here, choose the "Folder" option.
Now, select the folder we created above.
Go back to the home screen and tap the "Done" button to save the home screen layout.
You'll now see both the shortcuts on your home screen. Just tap a shortcut to instantly enable or disable noise cancellation on your AirPods Pro.
Love using your AirPods Pro across your iPhone, iPad, and Mac? Here's how you can manually switch AirPods between all your devices, using different apps and shortcuts. RELATED: How to Manually Switch AirPods Between Mac, iPhone, and iPad | ||||||||||||||||||||||||||||||||||||||||||||||||||||||||||||||||||||||||
| How to Uninstall a Program on Windows 10 from Command Prompt Posted: 21 Dec 2020 06:07 AM PST
If you're using Windows 10 and need to free up some disk space, you can uninstall apps you no longer use straight from the Command Prompt. Here's how it's done. First, you'll have to run Command Prompt as an administrator to uninstall a program. In the Windows Search box, type "cmd," and then right-click "Command Prompt" in the results.
Next, click "Run as Administrator" in the menu that appears.
Command Prompt will now launch with administrator permissions. To uninstall a program using Command Prompt, you have to use the Windows Management Instrumentation Command-line (WMIC) software utility. At the prompt, type the following command, and then press Enter: wmic
You'll now see the
Next, you'll want a list of the programs installed on your computer. Getting this list is essential because you must provide an accurate product name to successfully execute the uninstall command. Type the following command to get the list: product get name
Find the name of the program you want to uninstall from the list. You can uninstall the program by running this command: product where name="program name" call uninstall Just replace product where name="Skype Meetings App" call uninstall
You'll then be asked to confirm if you really want to execute the command. Type
After a few moments, you'll receive a message telling you the method was successfully executed.
The application has now been uninstalled from your computer. This is just one of the many ways you can uninstall an application on Windows 10. You can also do so from the Control Panel, Start menu, or Settings window. | ||||||||||||||||||||||||||||||||||||||||||||||||||||||||||||||||||||||||
| Intel Core i7-1185G7 vs Core i7-1165G7 Review Posted: 20 Dec 2020 11:50 PM PST Following up to our first Tiger Lake review, today we’re taking a look at Intel's flagship 11th generation mobile processor, the Core i7-1185G7. The CPU we looked at before, the Core i7-1165G7, is seen in far more laptops on the market and is going be the primary focus for most laptop buyers, however the 1185G7 is technically the faster CPU and the chip that sits right at the top of the table. If you missed the previous review and want to learn more about Tiger Lake's architecture and new features, we strongly recommend you check that out first. In particular, the review of the Core i7-1165G7 talks about the differences between this 11th-gen line and previous 10th-gen parts like Ice Lake. Our main focus in this article will be comparing the 1185G7 to the 1165G7, to see if this faster CPU is actually worth buying.
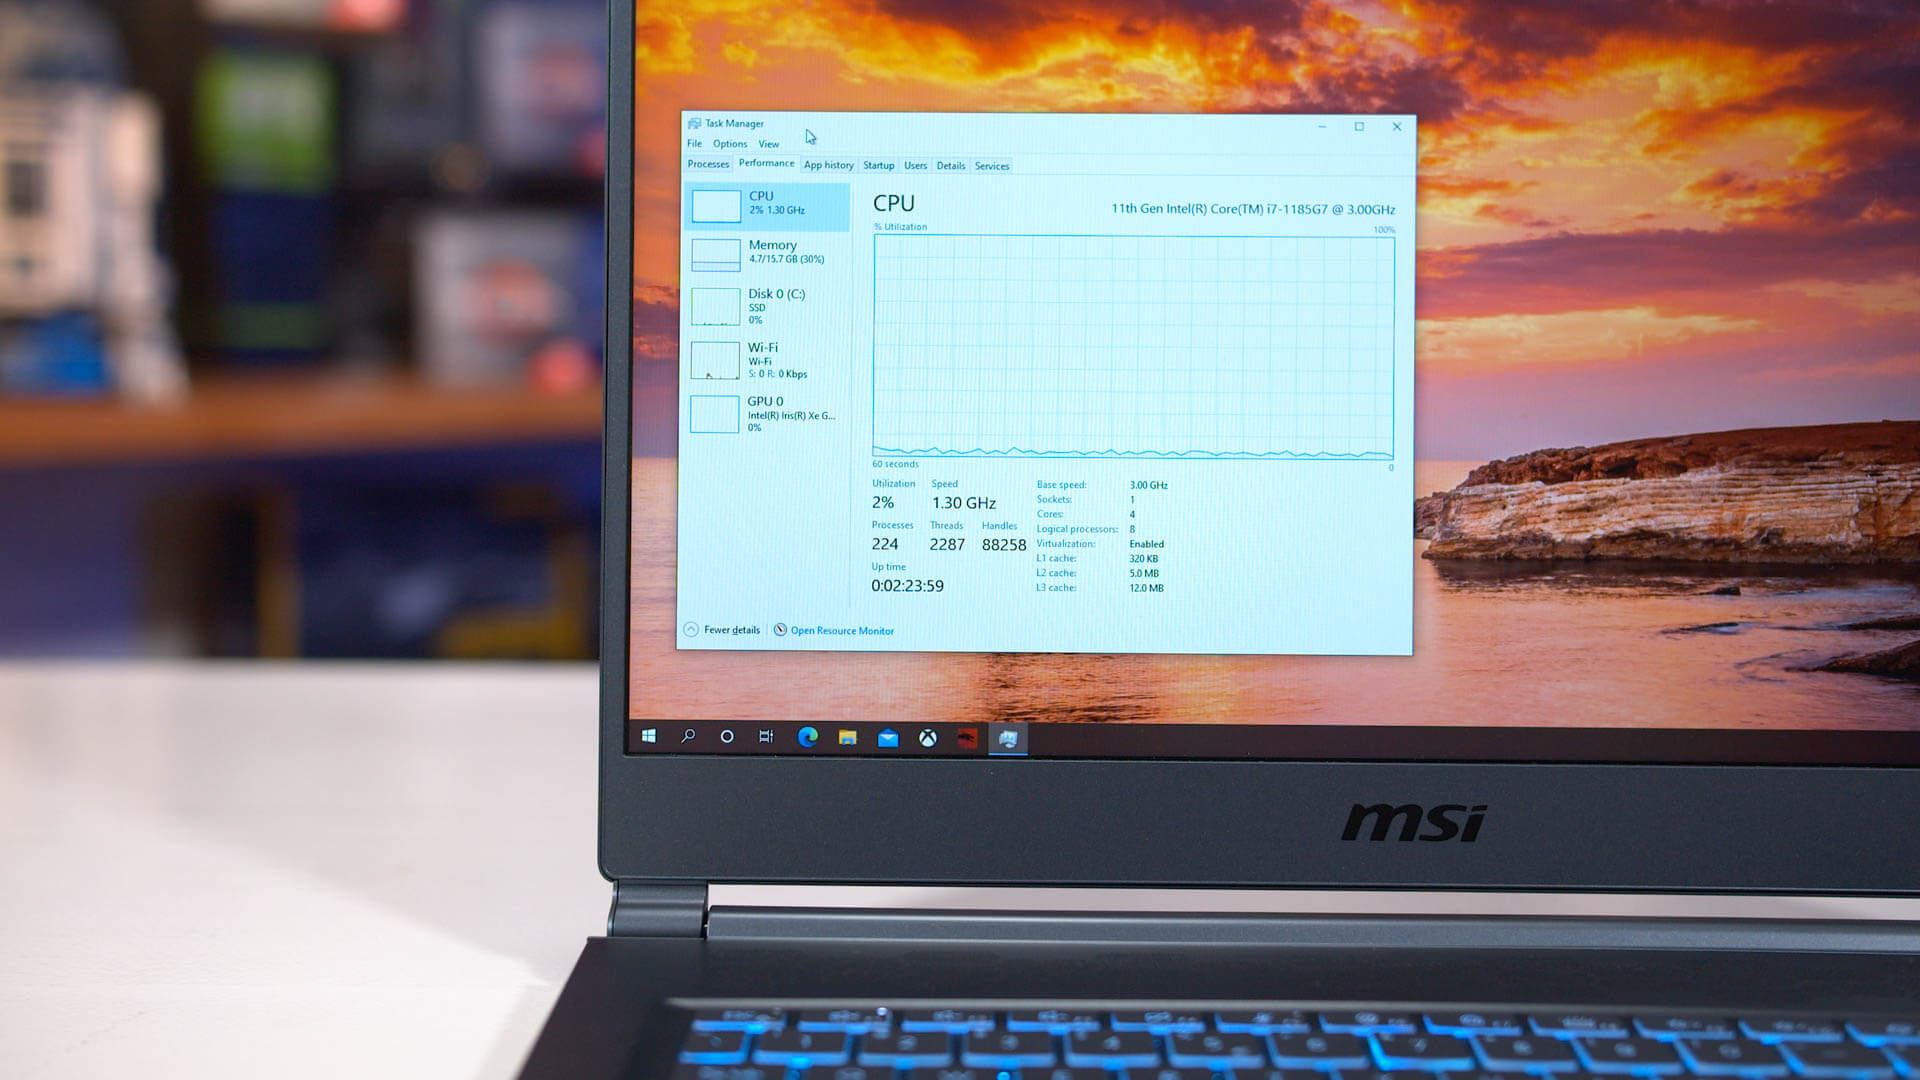
So how does the 1185G7 differ to the parts below it? Well, not in many ways to be honest. We're still looking at the same design, sporting four Willow Cove CPU cores with eight threads, and an Xe-LP GPU with 96 execution units. The only real difference is in frequency: the max single core turbo increases from 4.7 to 4.8 GHz, while the base clock at 28W rises from 2.8 to 3.0 GHz. There's also a 50 MHz gain to max graphics frequency, which is hardly worth talking about. Feature support otherwise is identical, as is the 12MB of L3 cache.
Judging purely on specifications, the 1185G7 is essentially a better binned version of the 1165G7 that allows those slightly higher clocks within the same power envelope. Intel are likely taking the best Tiger Lake silicon they have, the best that 10nm SuperFin can do in this power class, and allocating those as Core i7-1185G7 CPUs.
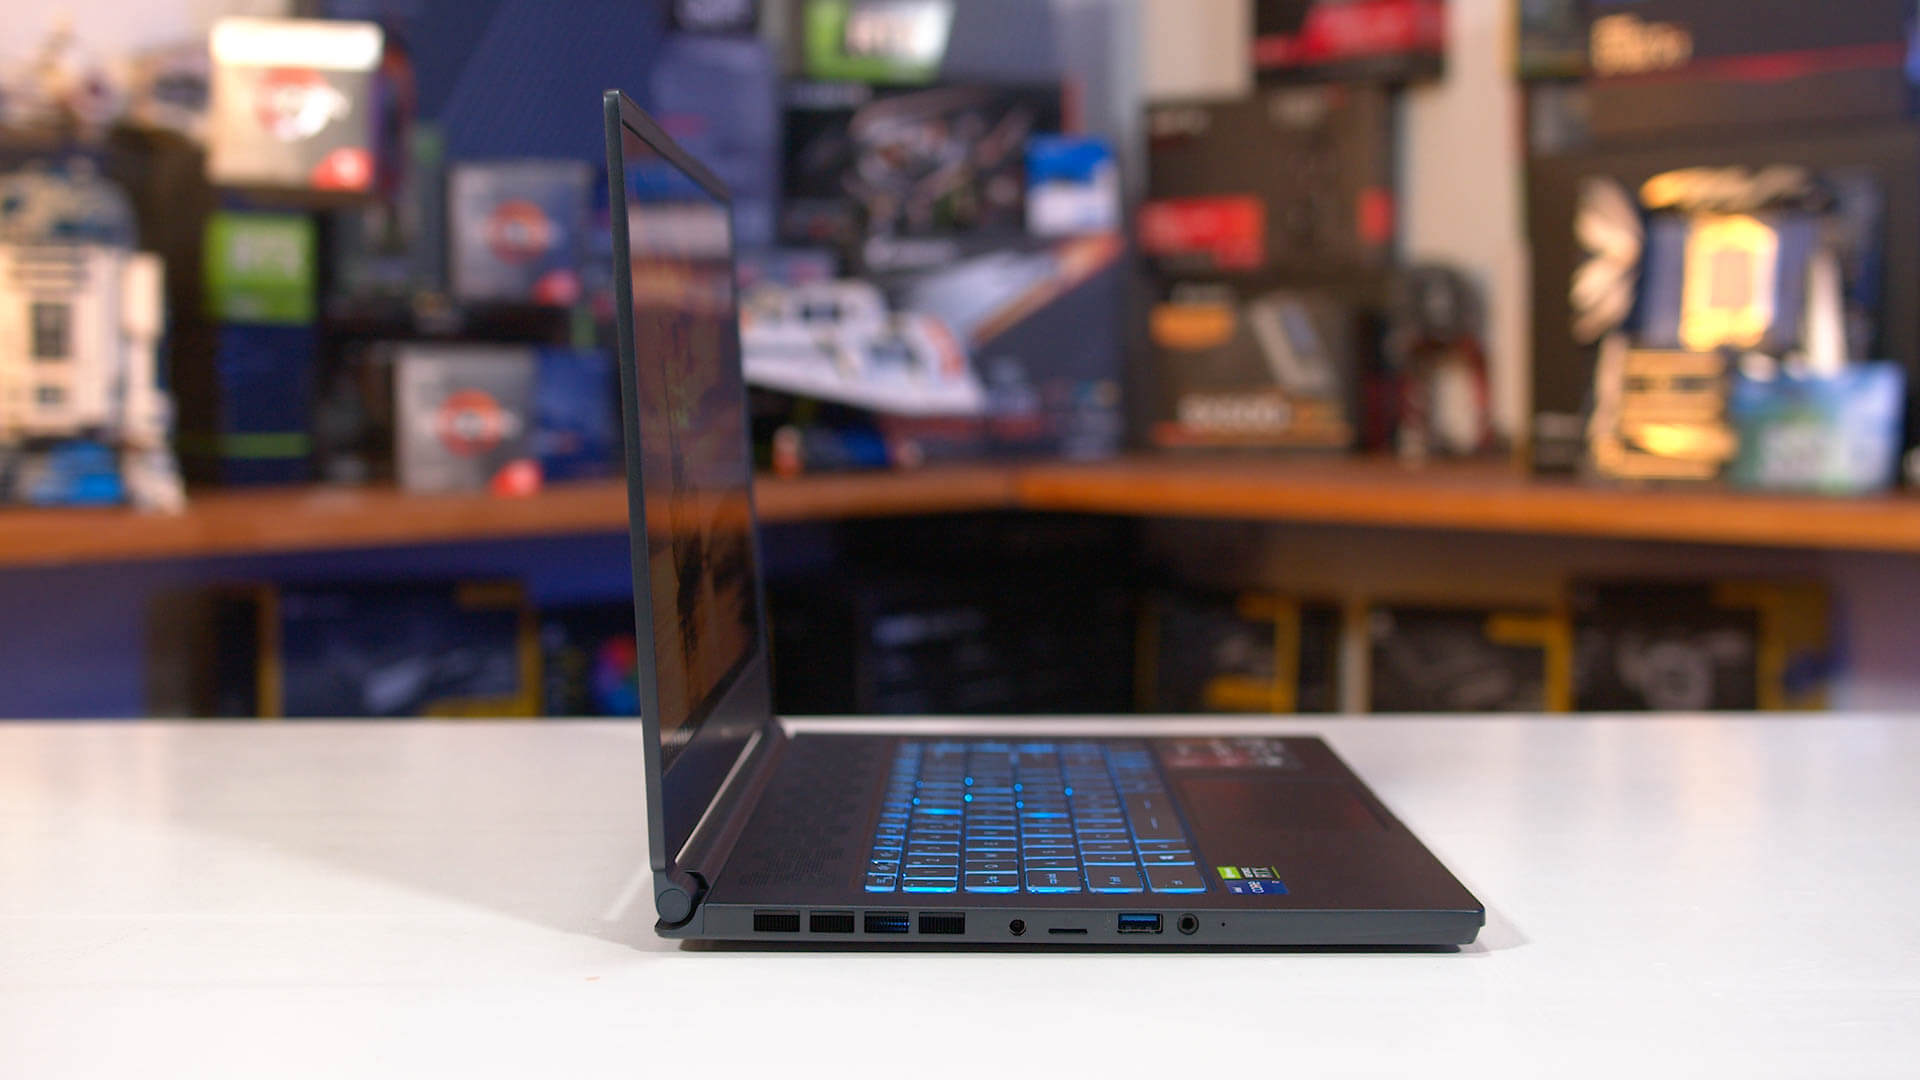
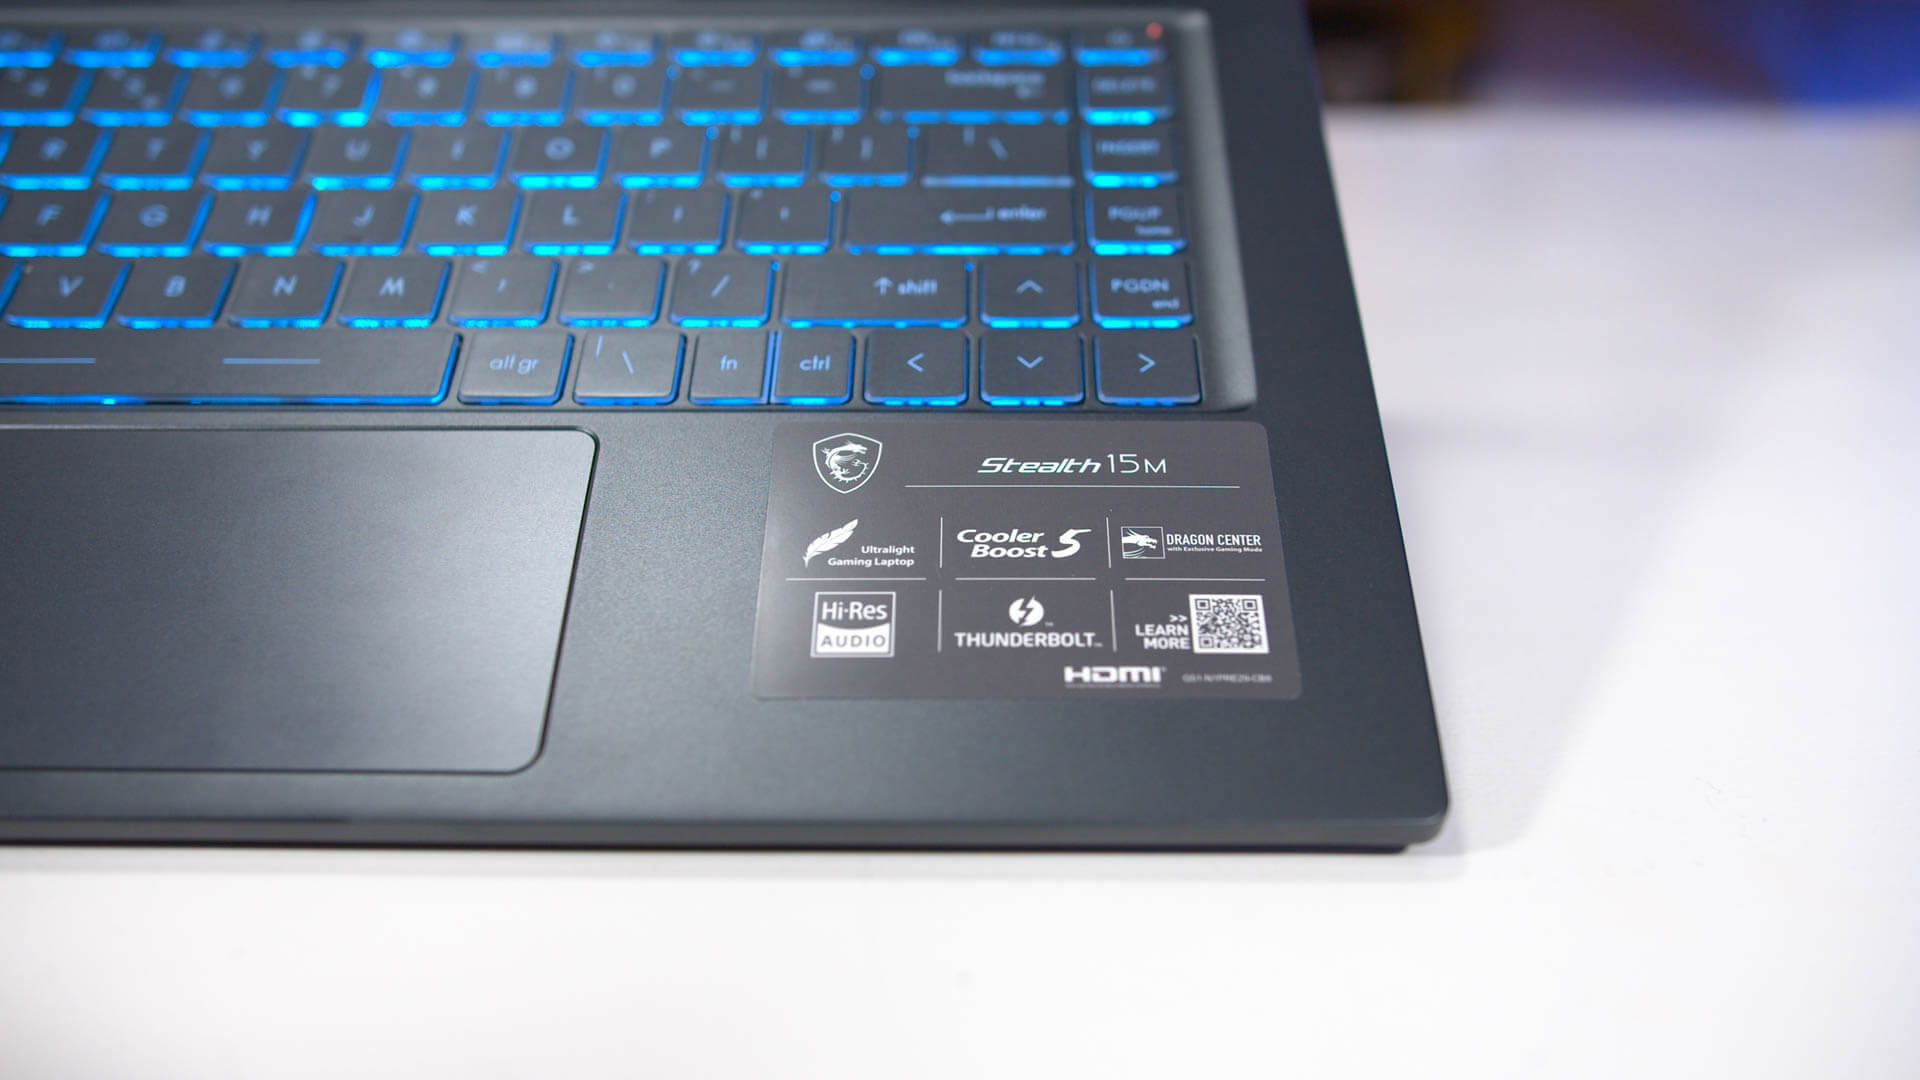
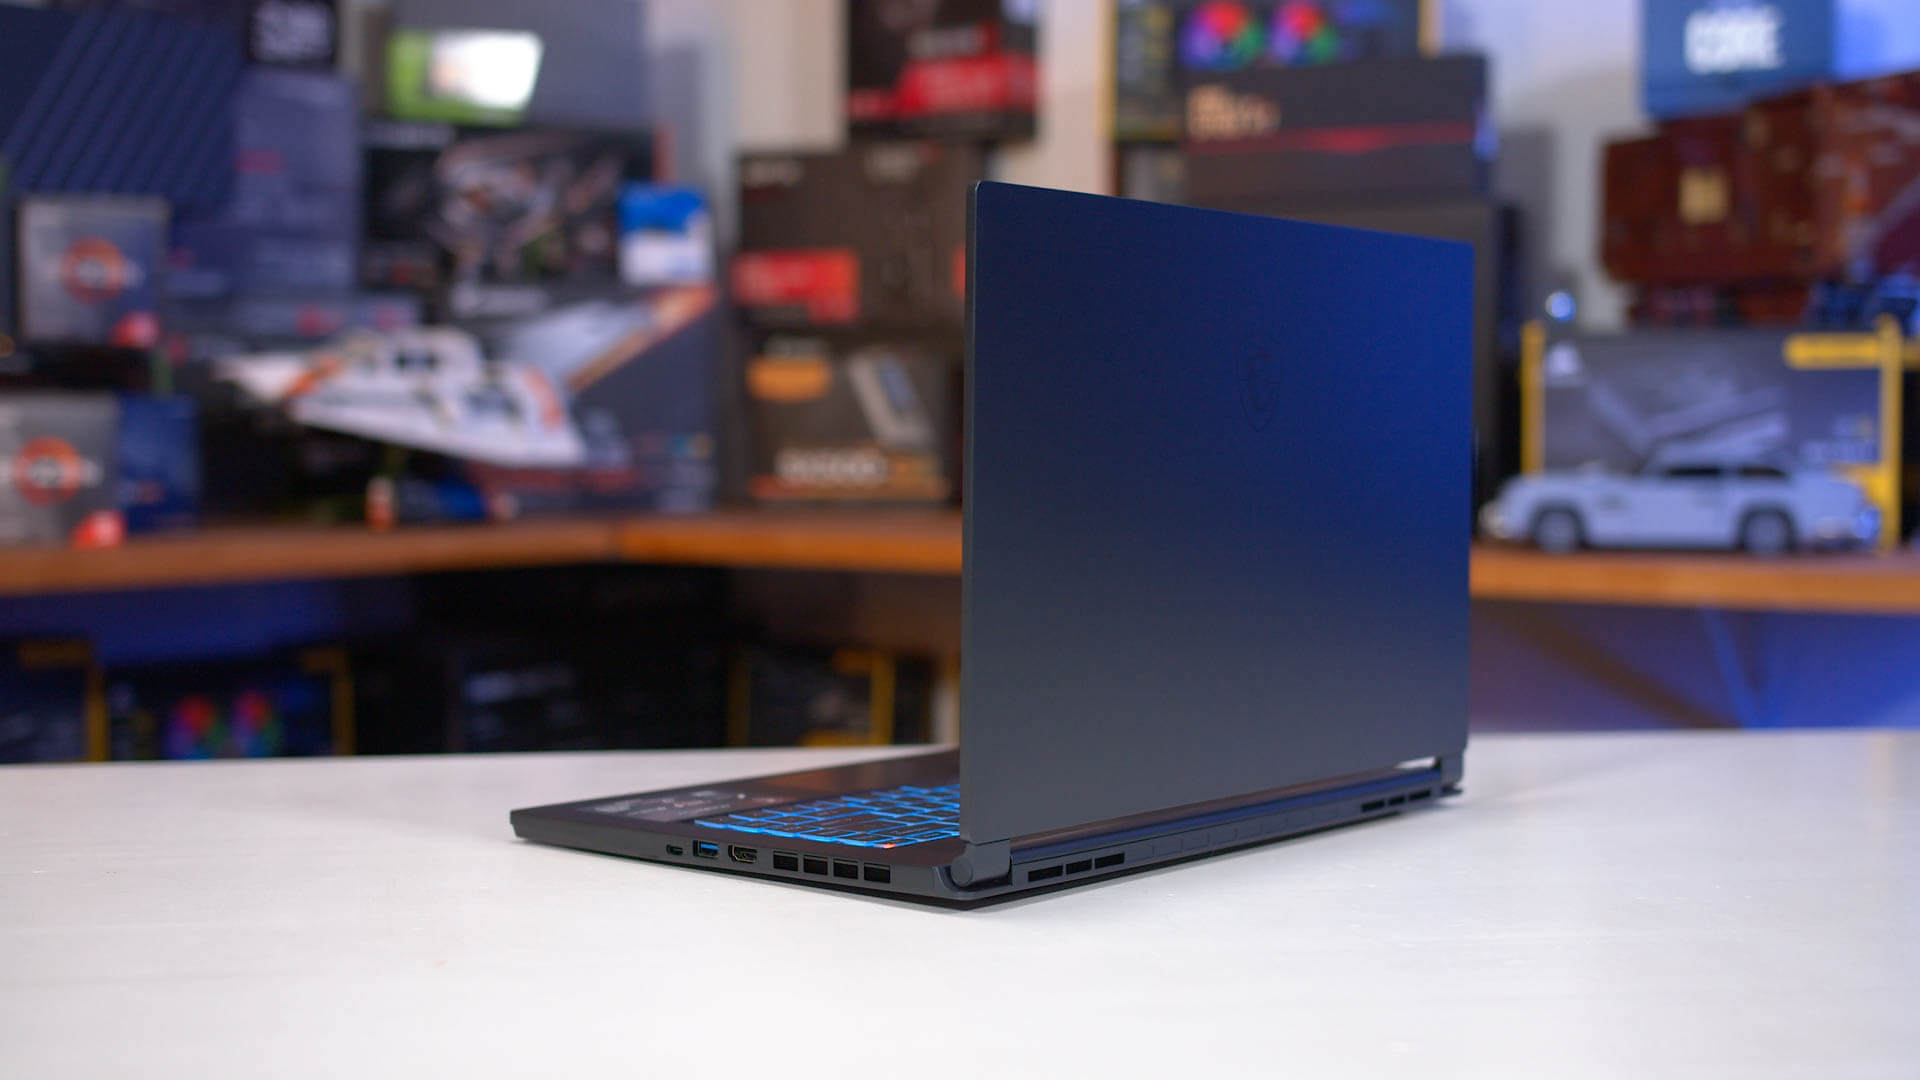
While the customer price for this part is the same as the 1165G7 — $426 as listed in Ark — the realities of OEM pricing are complex with all sorts of bulk deals and discounts, so in practice it's unlikely that an 1165G7 would actually be the same cost to integrate as Intel's better CPU, otherwise every vendor would just use the faster part. For today's testing we’re using the MSI Stealth 15M, a unique laptop that's a hybrid of MSI's gaming laptop designs with their more ultraportable designs. This is a very compact design for something with a 15-inch display, at just 3.8 lbs and 16mm thick. But inside you're getting a Core i7-1185G7 and GeForce RTX 2060 Max-Q graphics, with at least 16GB of dual-channel DDR4-3200 memory. Rather than using an H-series CPU in this laptop, MSI have prioritized graphics performance given the machine’s dimensions and cooling, opting for the 1185G7 instead.
Default power configurations for the Stealth 15M allow the CPU to push up to and beyond 40W of sustained power at times, above the maximum official cTDP spec up to 28W. We'd love to have tested this mode and also test with the discrete GPU enabled, but due to the limited amount of time we had with the laptop, we had to stick to our regular configurations that focused on the 1185G7 at relevant power levels. This means that like our testing for every other laptop CPU so far, we've got data for the 1185G7 running at 15W and 28W, with the boost behavior left in tact.
The idea here is to give a general look at performance that tries to remove as many OEM-specific configurations and bottlenecks as possible. This normalized testing allows you to see how much performance you can get out of a given laptop cooling design, as of course more power hungry parts require larger, heavier and often louder coolers, so it's not really fair to compare a 15W CPU to a 28W CPU, for example.
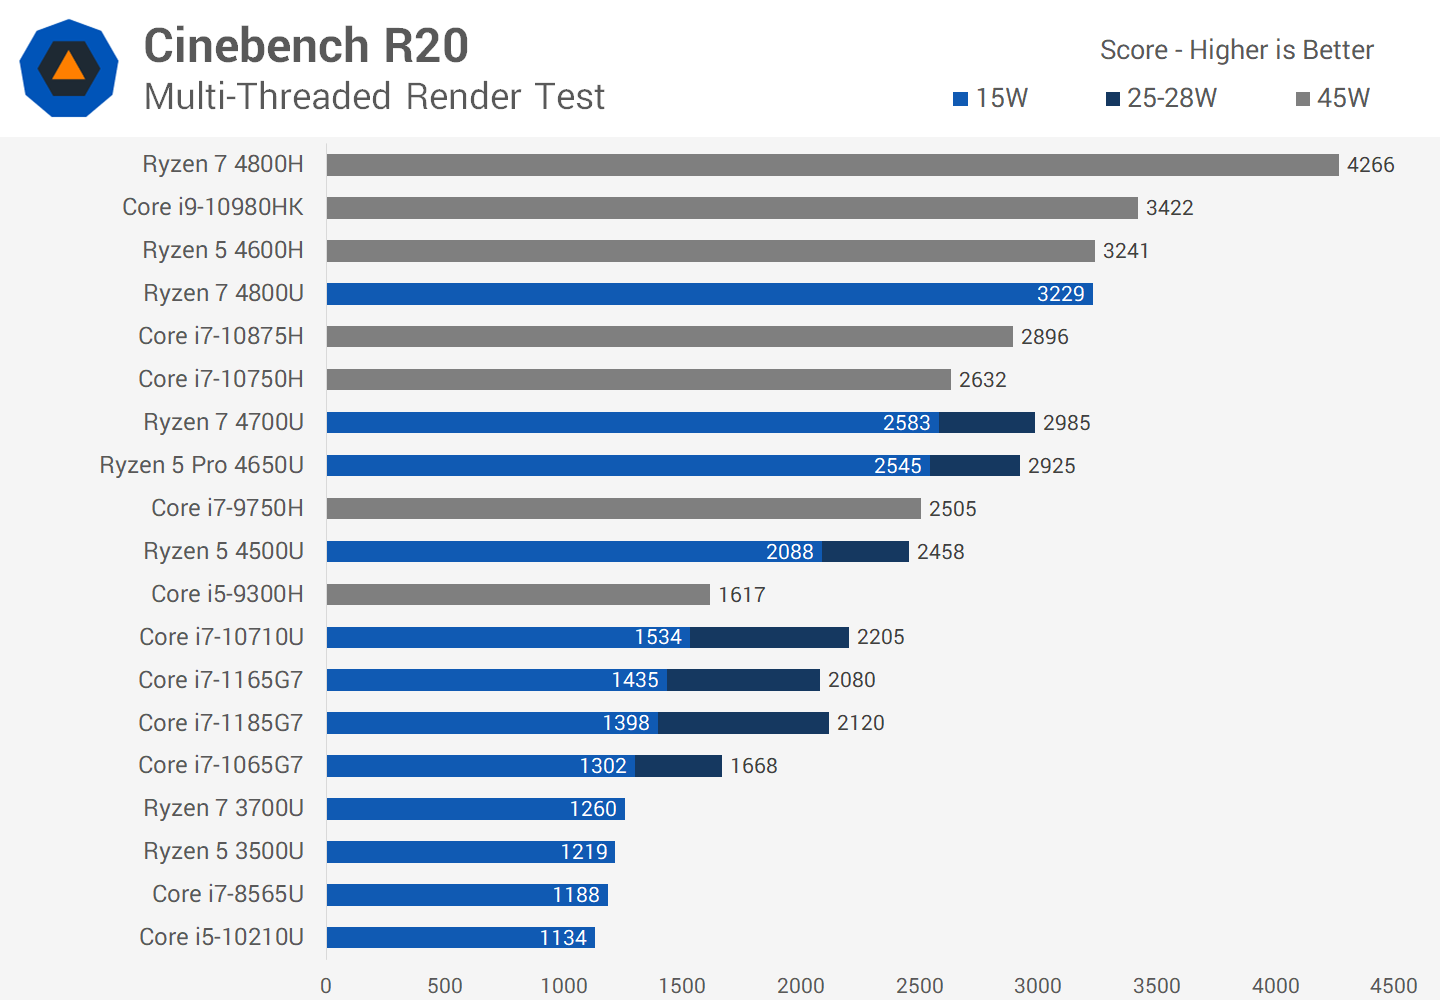
This is the usual spiel for our laptop testing, if you seen our benchmark reviews before this is how we've been doing it for quite some time now. Those after laptops that are super thin and portable should more focus on the 15W numbers, while those after a larger, more premium design should look at the 28W performance. BenchmarksWe'll start off benchmarking with Cinebench R20 where the 1185G7 delivers the same performance as the 1165G7. A little slower at 15W on average, and a little faster at 28W, though this could be down to the laptops we tested, the boost periods, and so on. The takeaway for multi-thread performance is that you probably won't be getting a significantly improved experience opting for the 1185G7 over the 1165G7, unless your 1185G7 laptop gives you access to more power, like the Stealth M15 does by default.
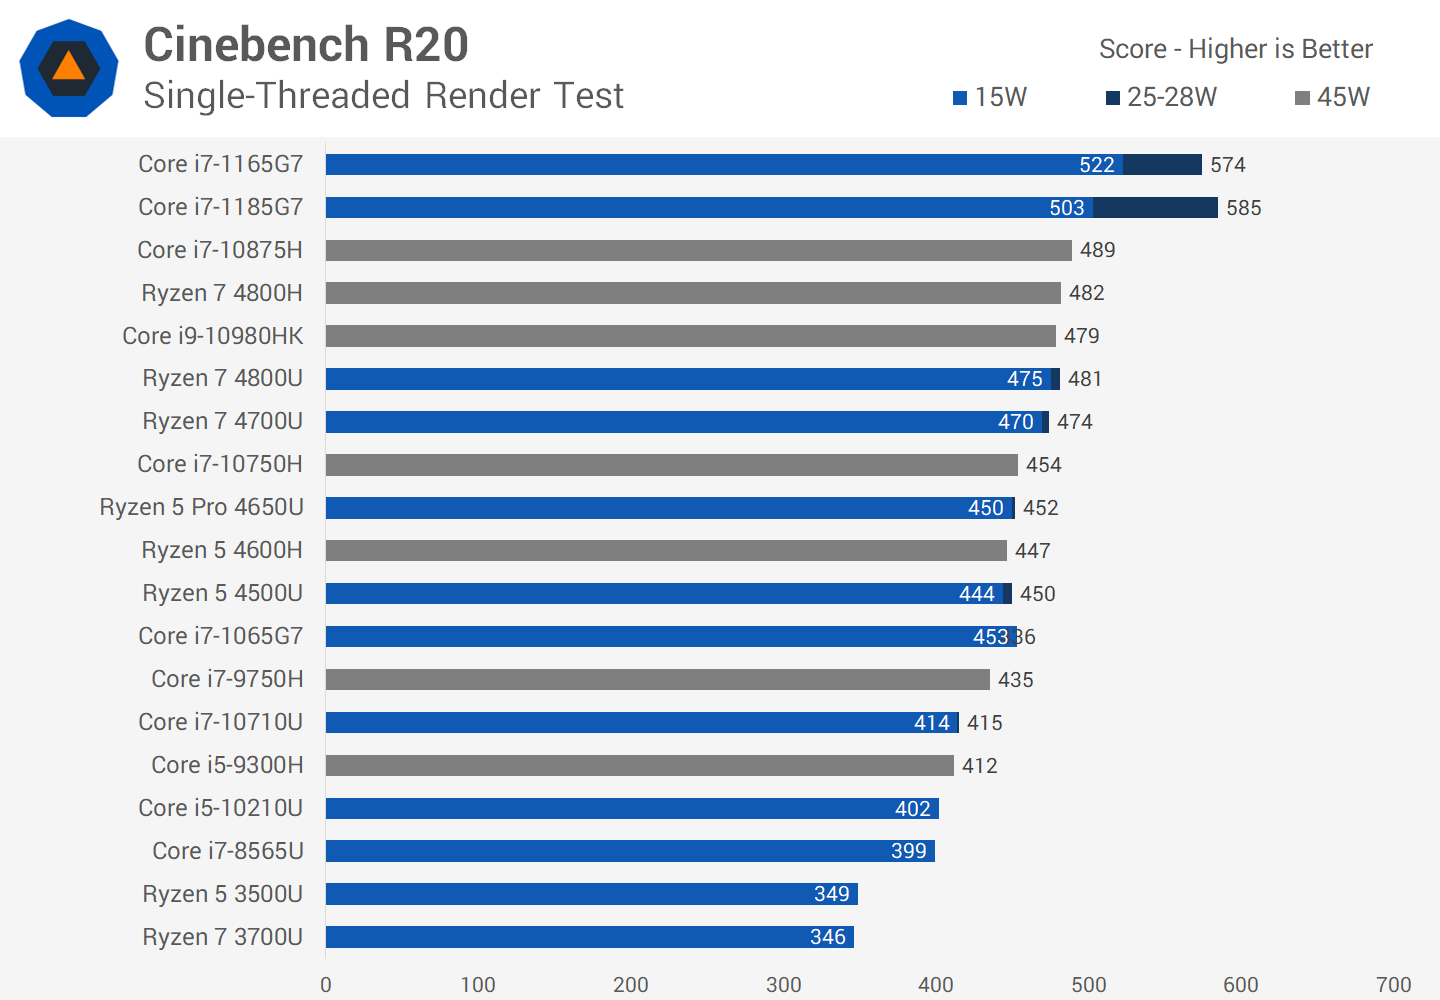
Single thread performance is more interesting. At 28W as expected, the 1185G7 is able to clock 100 MHz higher on a single core, which in our testing led to a small but perceptible improvement to Cinebench R20 single-thread. We're only talking ~2 percent higher clock speeds, so the gains are in line with that.
At 15W, the 1185G7 system was actually slower than the average 1165G7 result we've seen, with both of those configurations power constrained and unable to hit their maximum turbo clock.
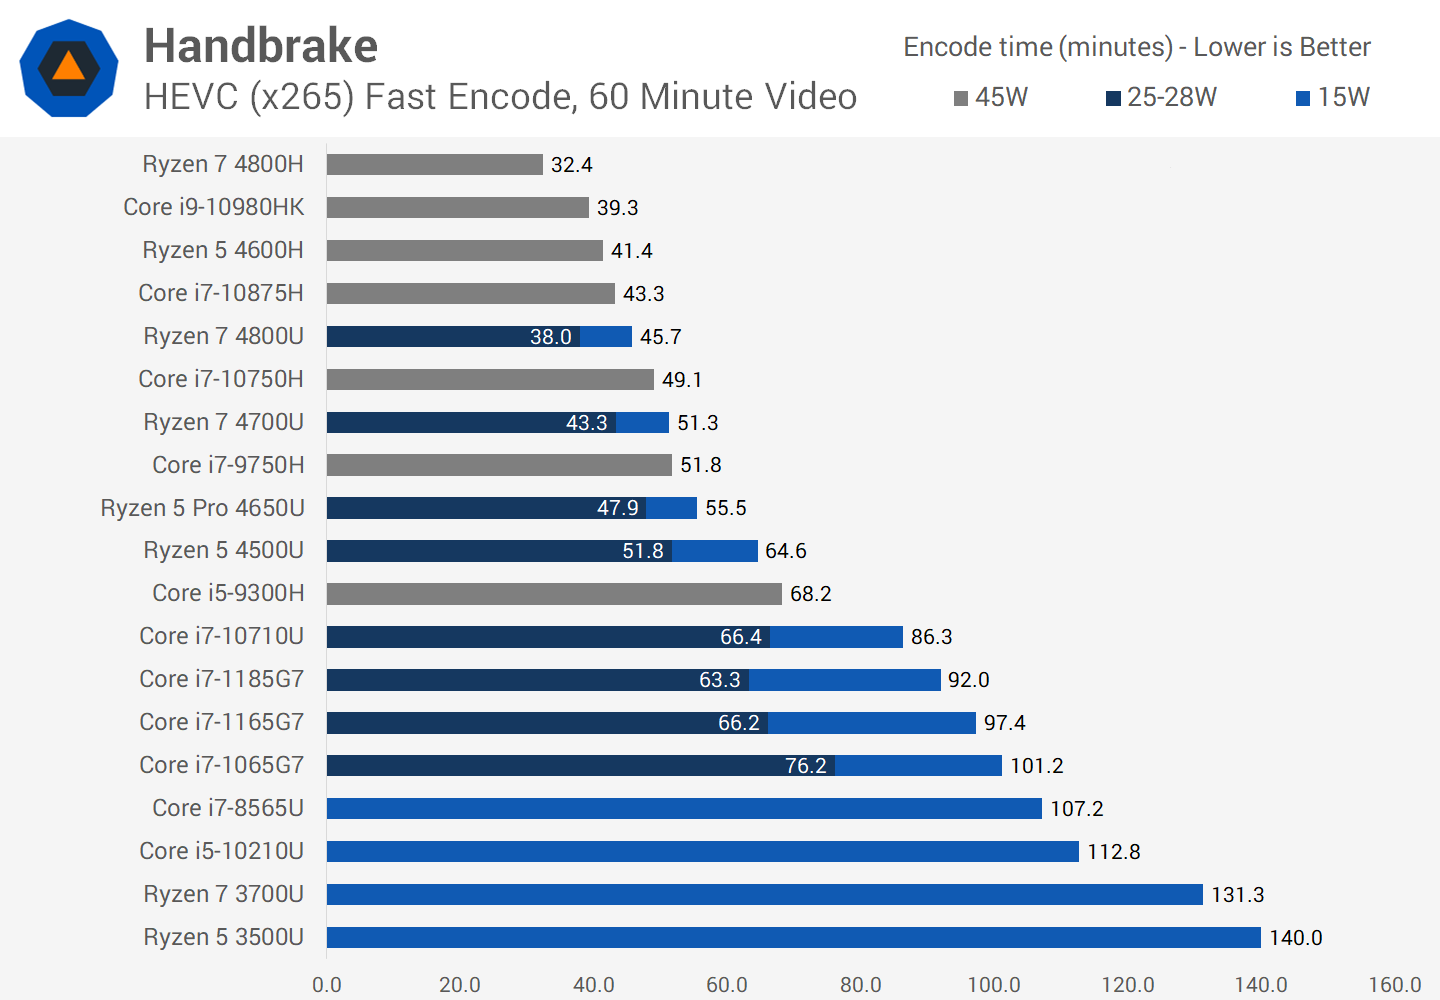
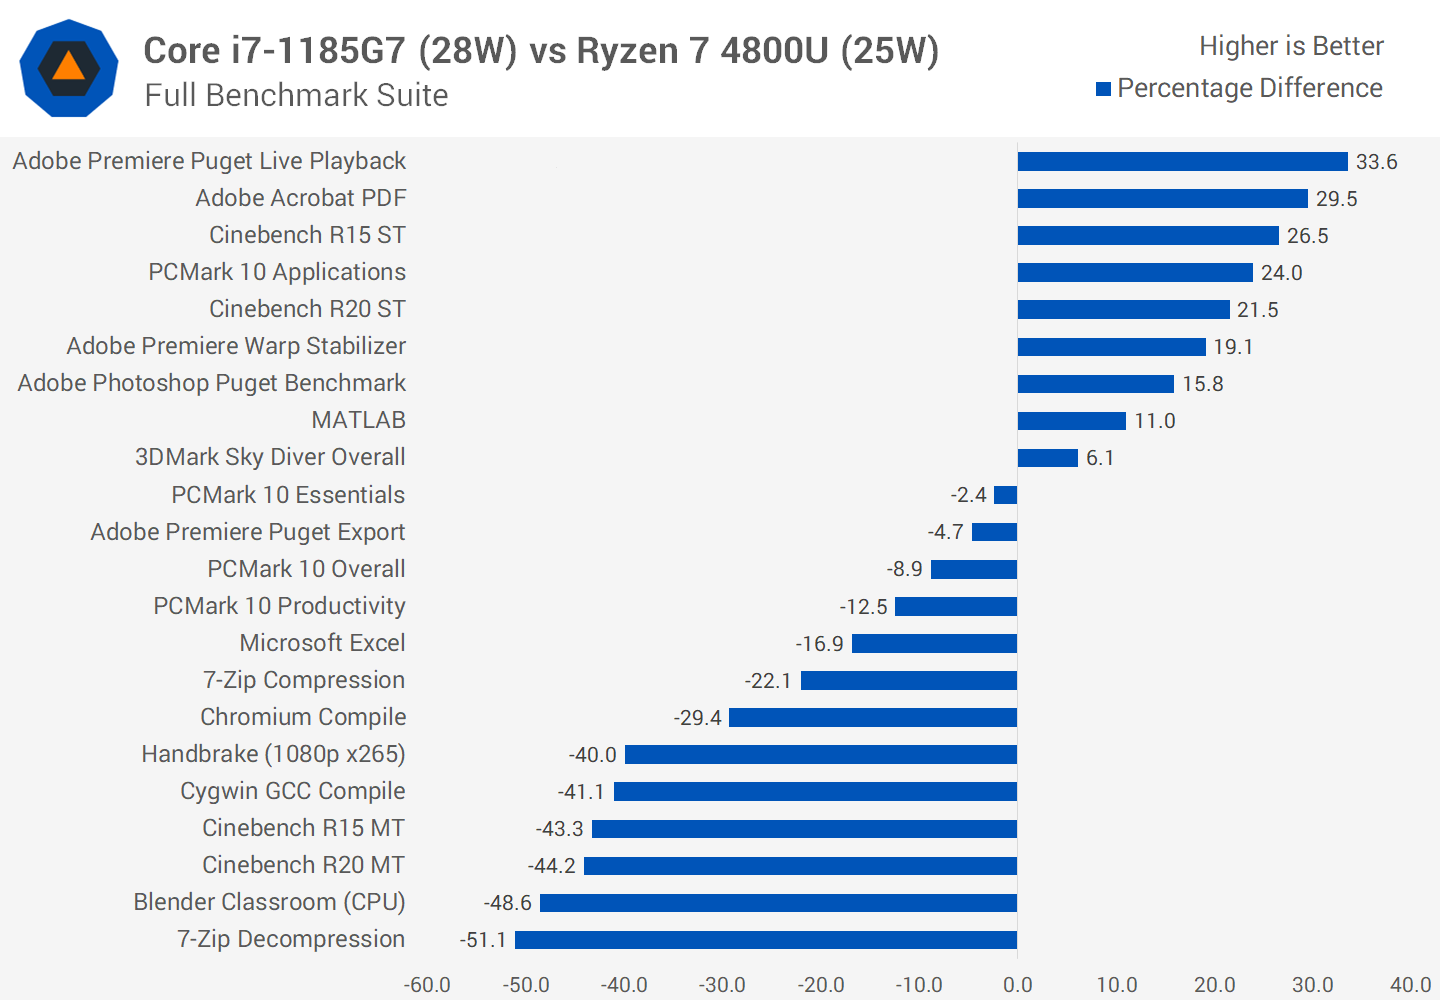
In Handbrake, the 1185G7 is slightly faster than the 1165G7, pointing to slightly better binning that allows for higher clock speeds in sustained multithreaded workloads within the same power limit. At both power limits the 1185G7 ended up five percent faster, although this doesn't allow Tiger Lake to make any meaningful strides at closing the gap to Ryzen Mobile 4000 in multi-thread tests: we're still at least 40 percent behind the flagship Ryzen 7 4800U with its 8 core CPU.
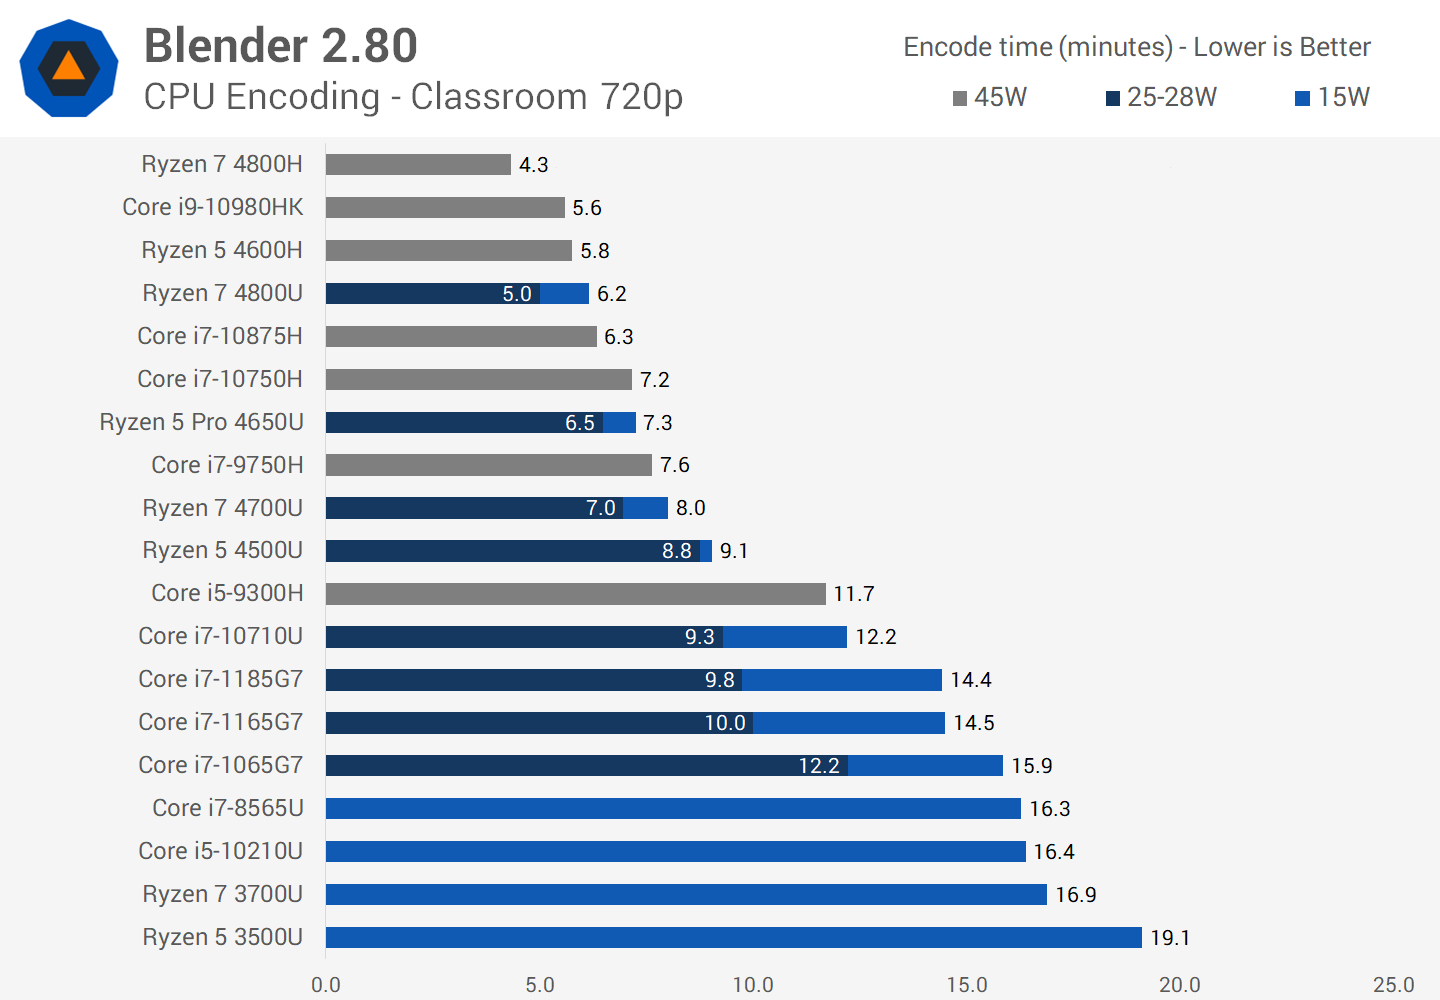
In Blender, the two top end Core i7 parts from Intel's Tiger Lake line deliver essentially the same performance. Like with Handbrake, Ryzen is considerably faster in this workload, so you should consider them instead of Intel if this application matters to you.
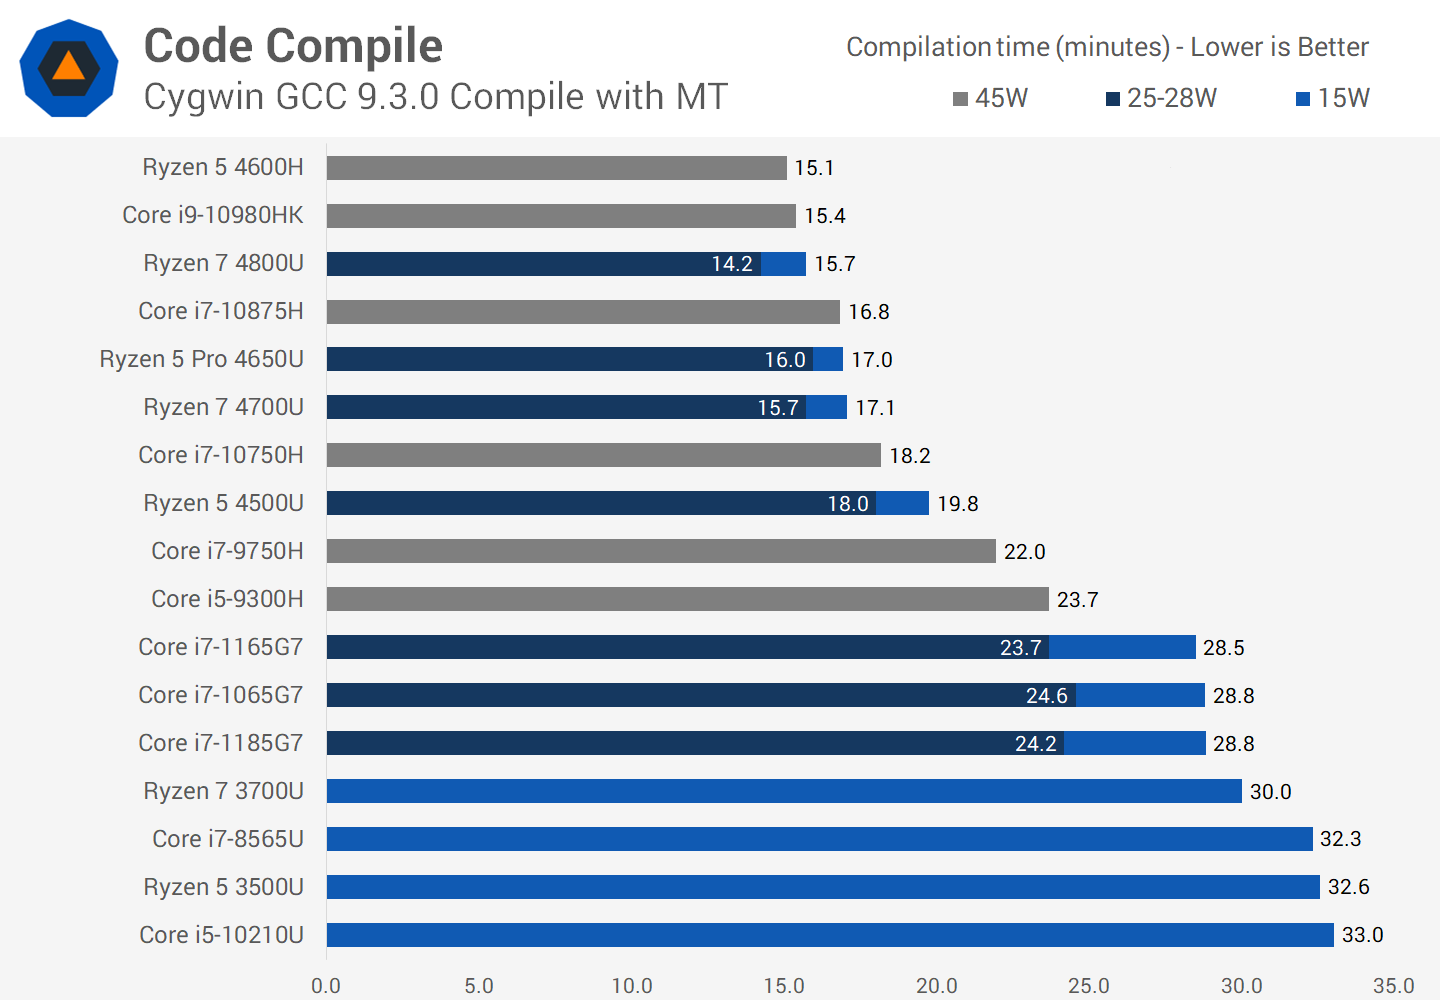
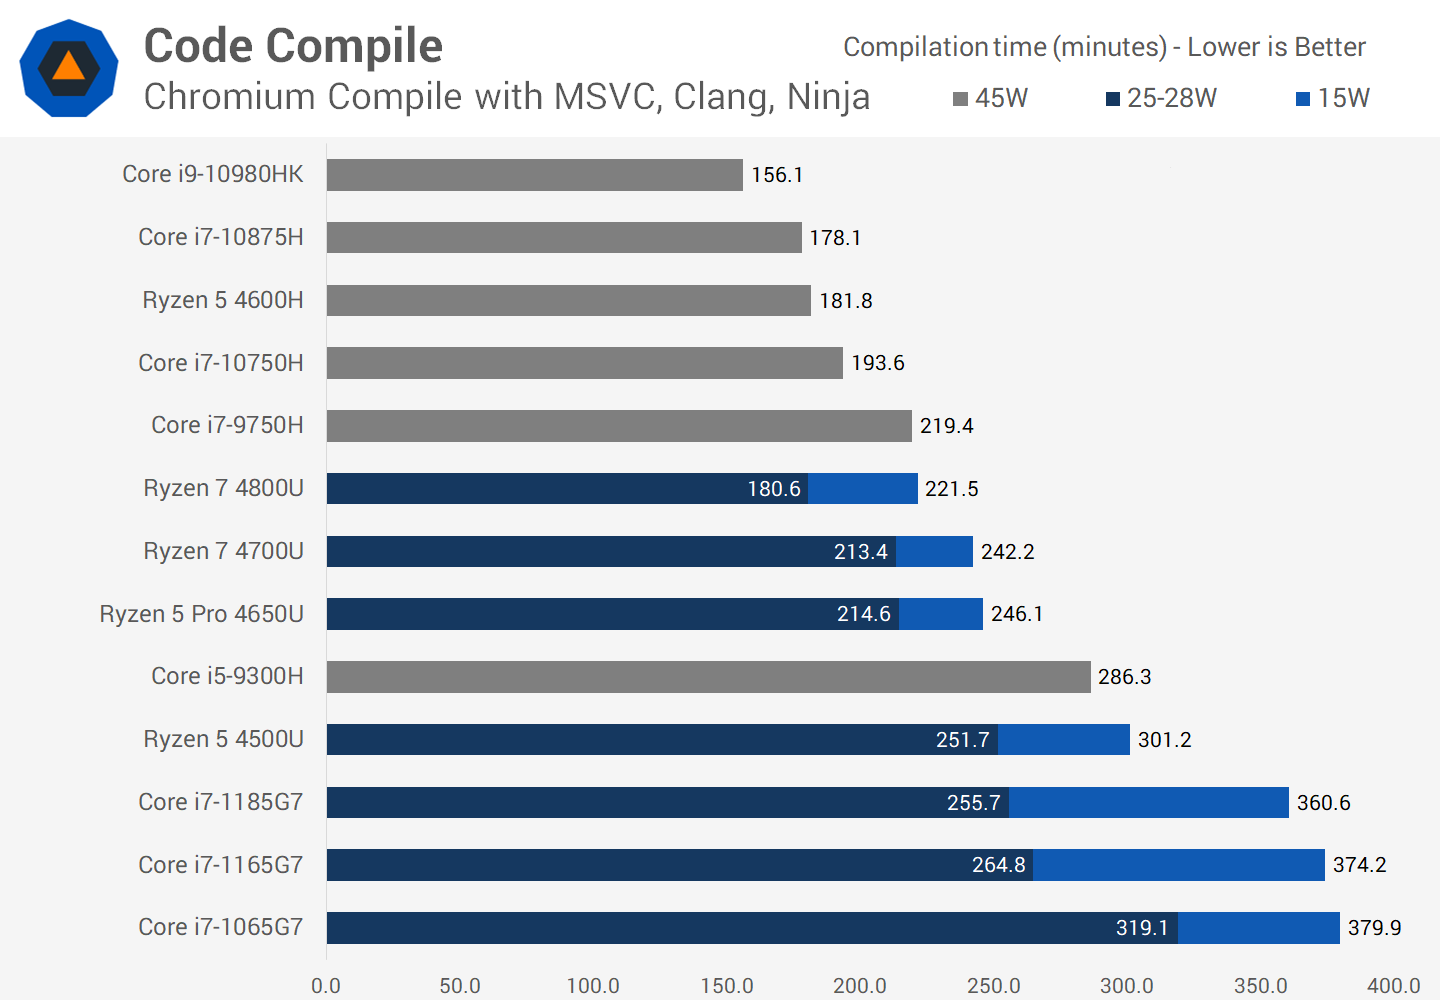
For code compilation there's a marginal difference between the i7-1185G7 and i7-1165G7 in both of our benchmarks. Here with compiling GCC, the 1185G7 is slightly slower than the 1165G7, while with Chromium compilation it's slightly faster. Not groundbreaking stuff really.
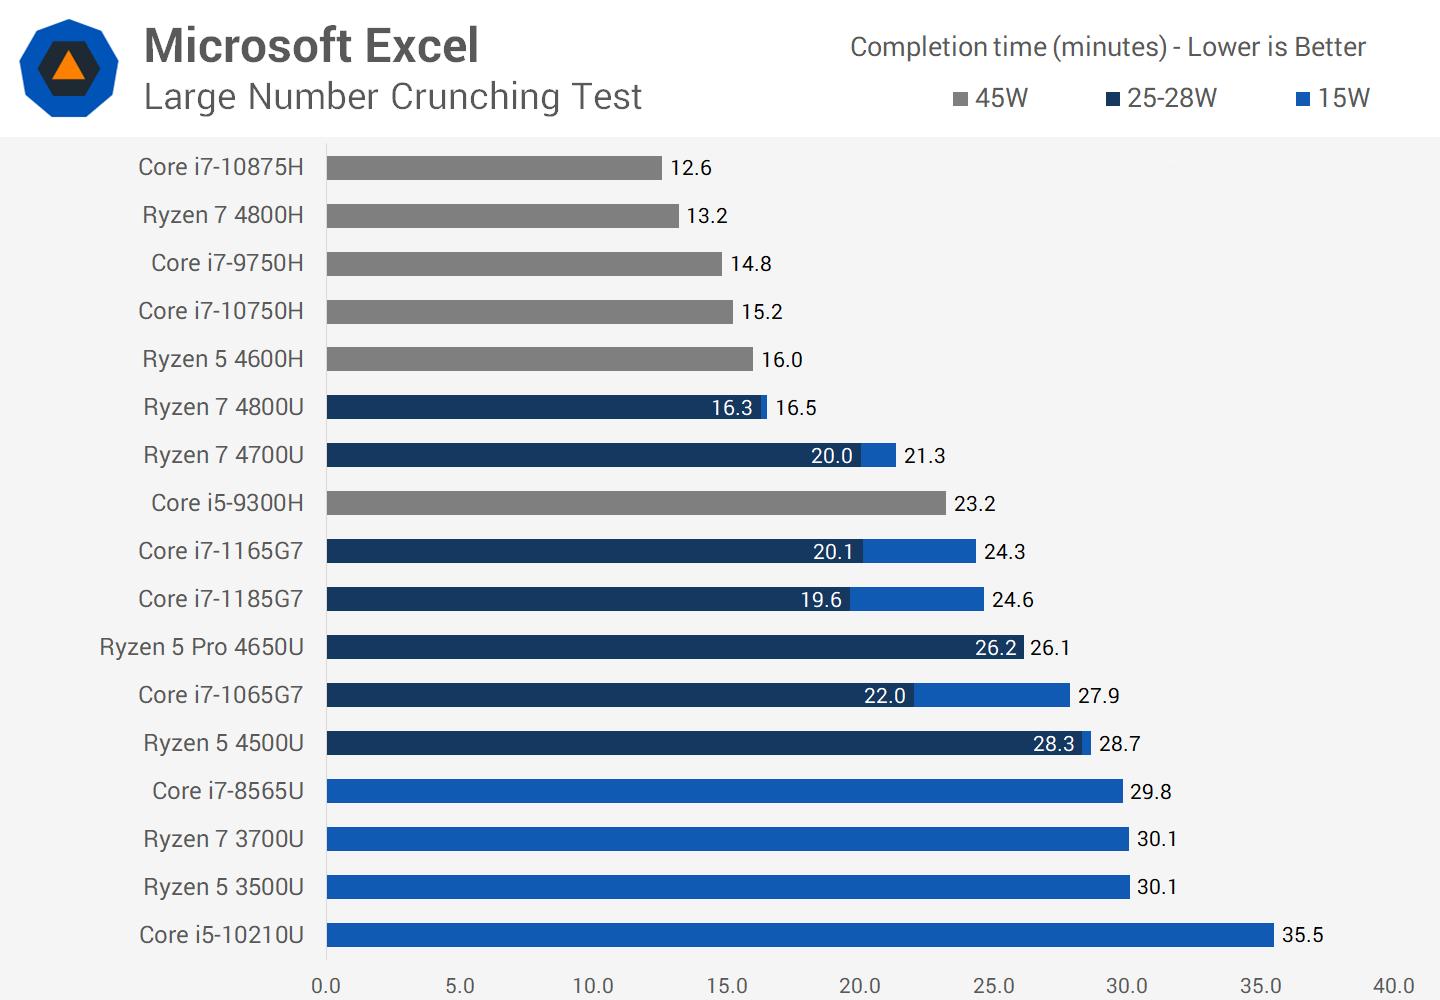
Let's breeze through some more tests. In Microsoft Excel, the 1185G7 is marginally slower at 15W and marginally faster at 28W compared to the 1165G7, but the difference is basically negligible.
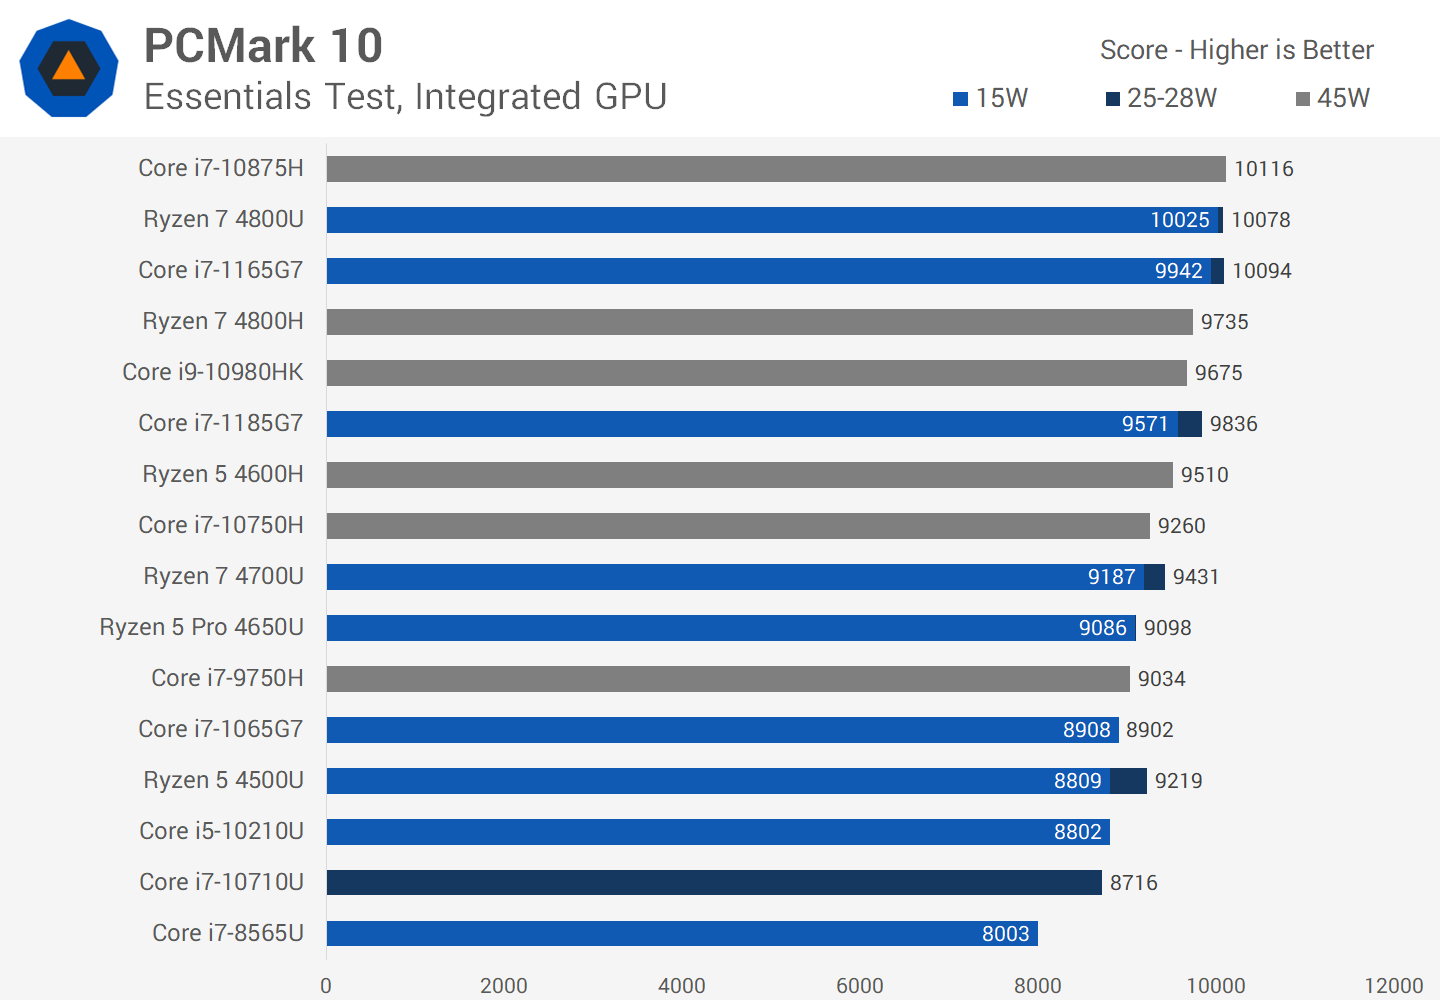
In PCMark's Essentials workload the 1185G7 ended up slightly slower than the 1165G7.
One of the biggest wins for the 1185G7 is in PCMark 10's Applications workload, which benchmarks the Microsoft Office suite as well as Edge browser. The 1185G7 was measurably faster, 9 percent faster at 28W and 8 percent faster at 15W, which is a handy boost to performance. This extended the lead Intel holds over Ryzen, with a huge 24 percent performance gap to the Ryzen 7 4800U at the higher power configuration.
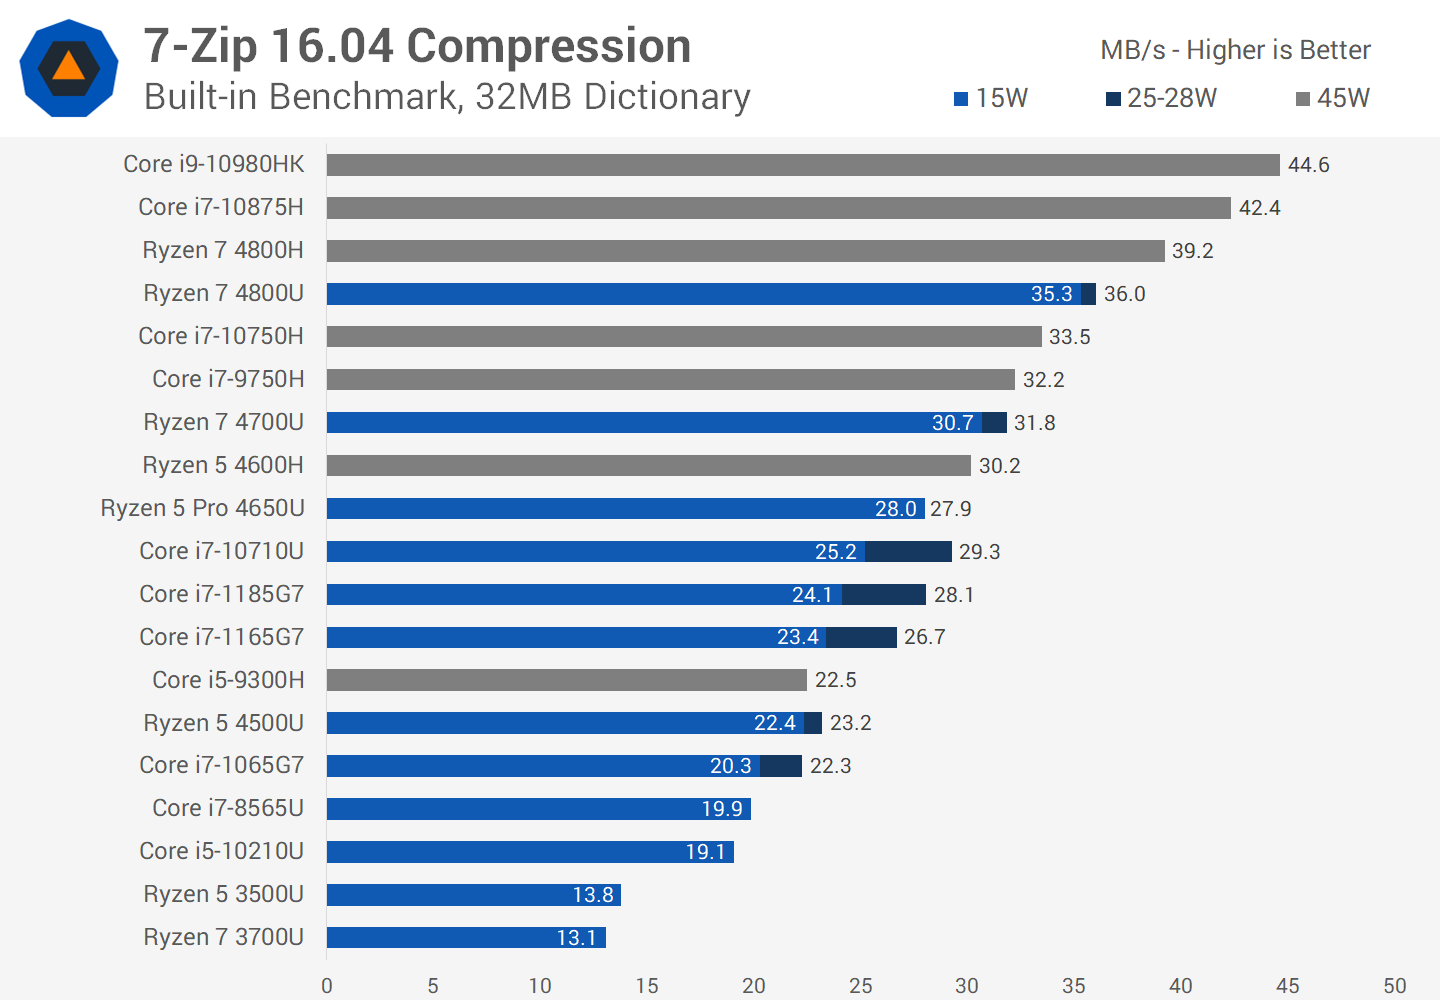
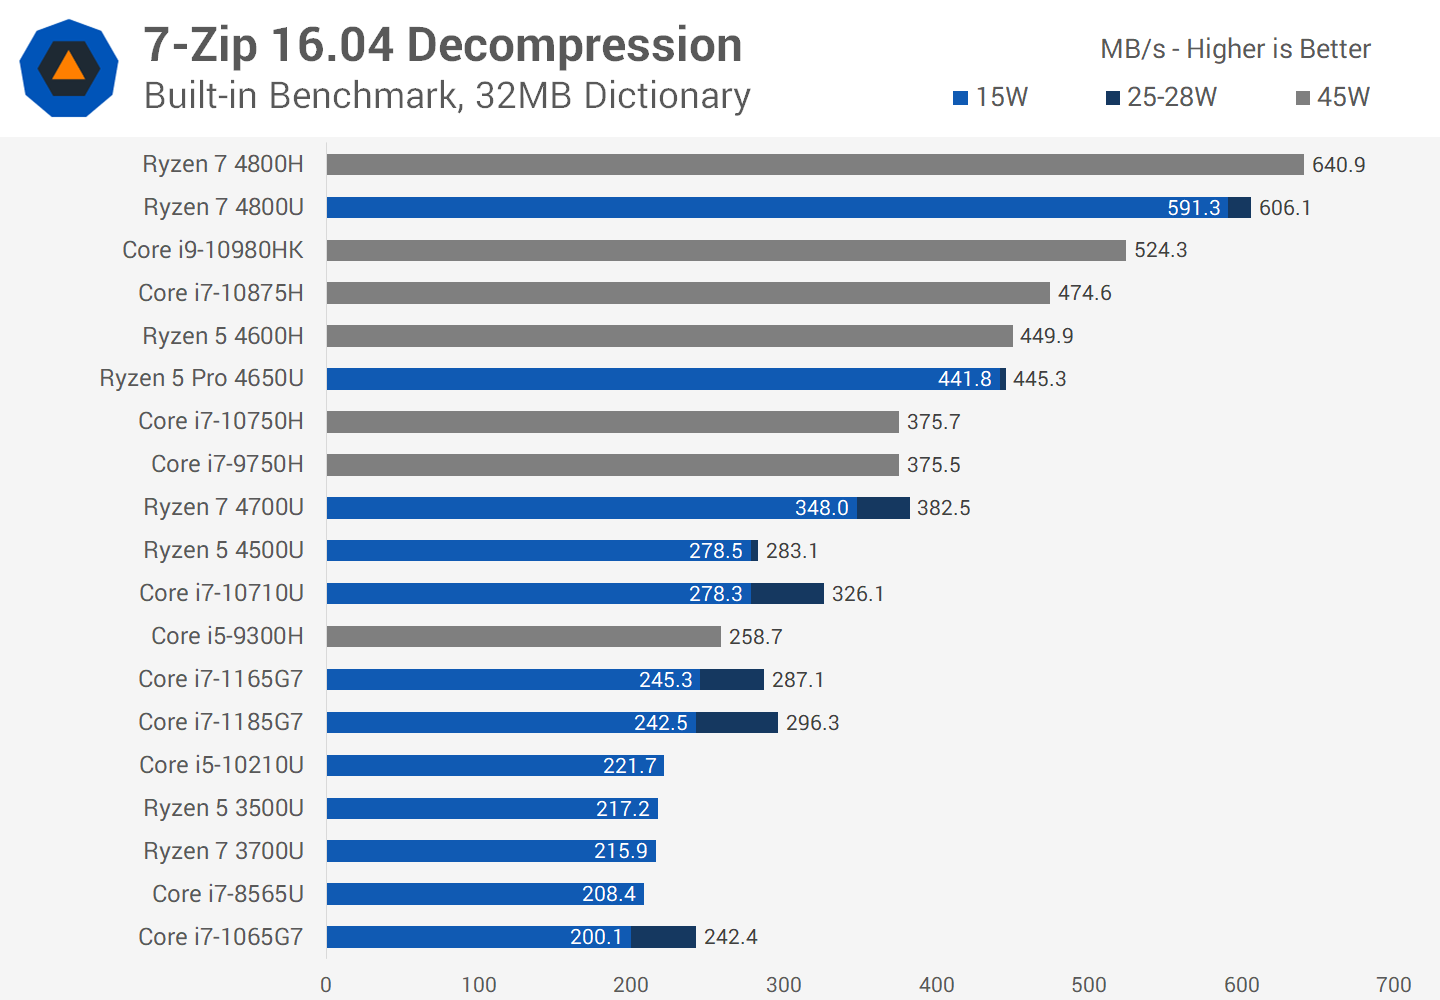
In 7-Zip, we're back to narrow margins between the 1185G7 and 1165G7. The higher end SKU creeps slightly up the charts but the difference doesn't meaningfully change Intel's position in the market versus Ryzen.
Acrobat PDF exporting is similar to other single-threaded tests in that the 1185G7 is faster than the 1165G7, but only when the additional frequency can be accessed. For that to happen, the CPU needs to be configured in its higher power state, those gains aren't there at 15W. So what we end up with is a negligible gain at 15W, but 4 percent more performance at 28W.
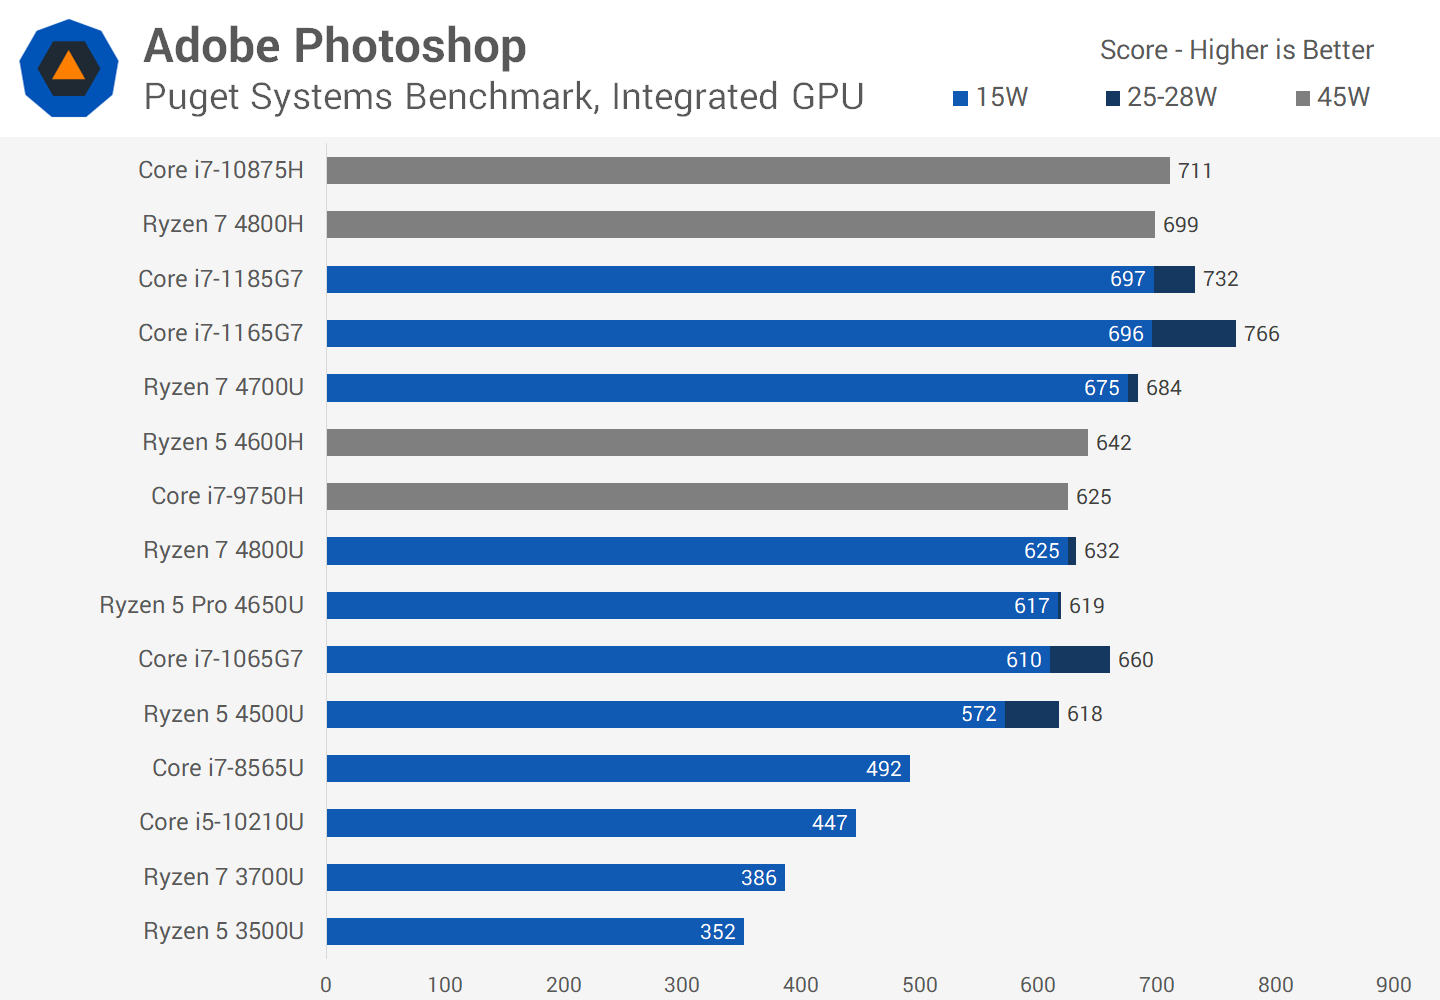
Adobe Photoshop performance was slightly strange in that the 1185G7 wasn't faster than the 1165G7 at 28W, although we are talking about less than a five percent difference. I believe the LPDDR4X configurations that are being averaged into these numbers for the 1165G7 are impacting performance somewhat, although at 15W performance is very similar.
Our last test is hardware accelerated Handbrake encoding, where we see no performance difference between the two Tiger Lake CPUs. While we didn't do extensive GPU or game testing for this review, we couldn’t spot any significant differences between media acceleration and integrated GPU performance, as these elements are identical in both CPUs. Performance SummaryCore i7-1185G7 vs Core i7-1165G7We could have gone deeper with testing but our time with the MSI laptop was limited and for the battery of tests that we did run, as you can see, we don't think there’s much more to be learned. There's not much separating the 1165G7 and 1185G7 in practice.
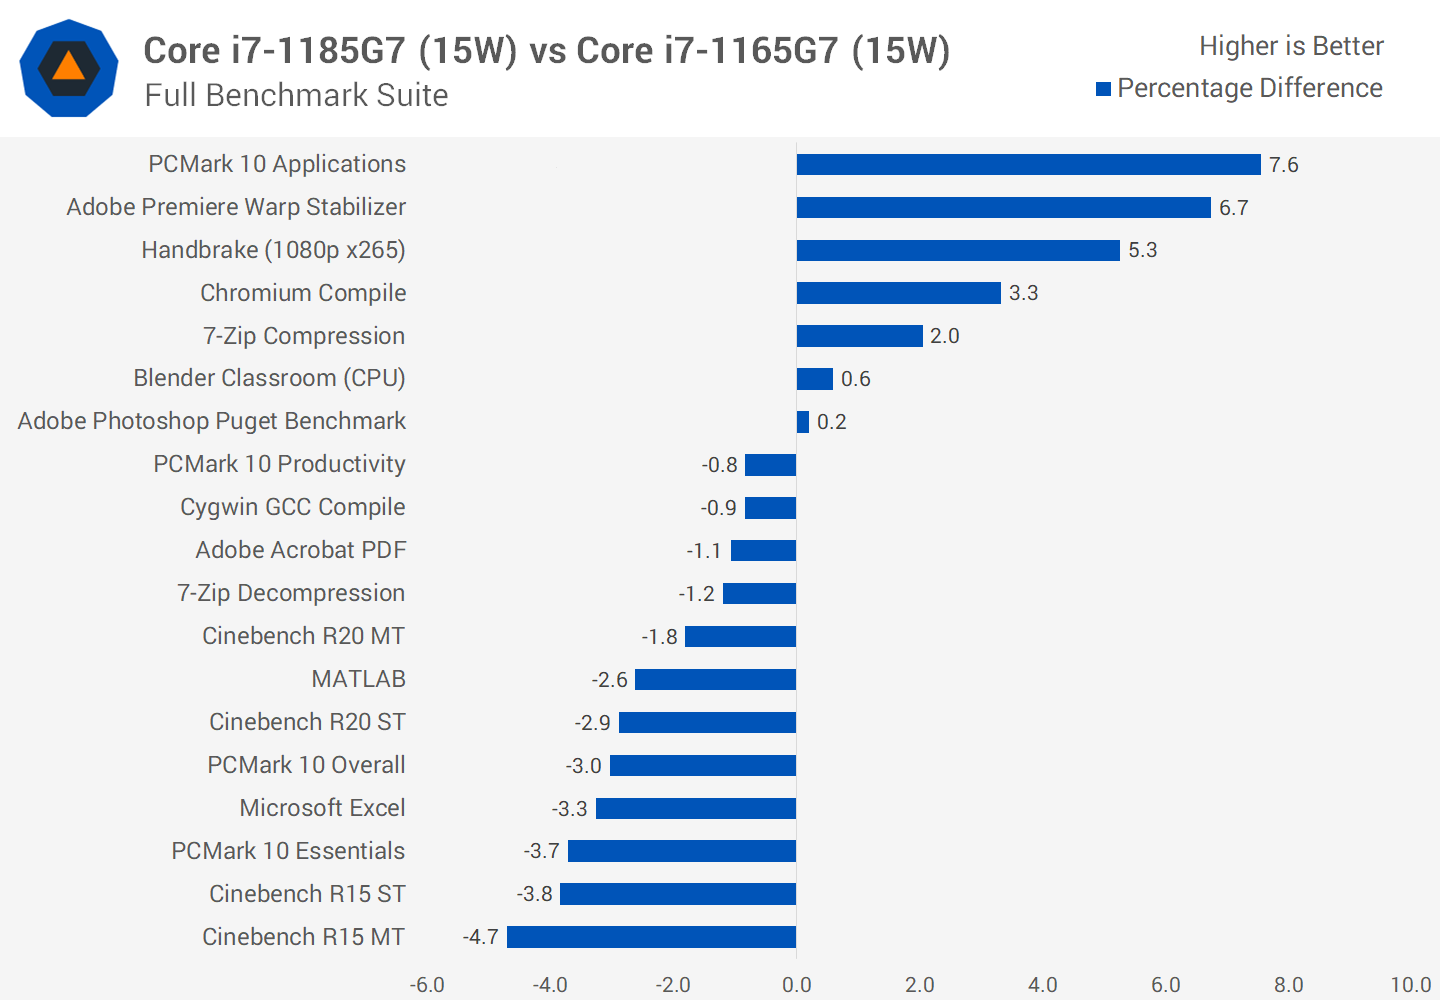
When looking at a benchmark breakdown between the two parts, it's indicative of two products that deliver roughly the same performance. Due to differences in laptop configurations, at times the 1185G7 is slower, and at times the 1185G7 is faster. You're more likely to see these gains in single-threaded or longer term workloads, where the 1185G7 was up to 9 percent faster. But on average across these benchmarks, the 1185G7 was a mere 1.2 percent faster, which is within the margin of error.
It's the same story at 15W, but with even narrower margins. On average these two parts deliver the same performance in this power class based on our testing. That's not an exciting conclusion, but it’s useful information if you’re buying a new laptop and wonder if paying extra for the “faster” chip in the same laptop is worth your time and money (… or not). Tiger Lake vs. RyzenAs the 1185G7 doesn't significantly improve upon the performance of the 1165G7, it also doesn't change the comparison between Tiger Lake and AMD’s Ryzen 7 4800U. Intel's Tiger Lake remains the faster platform for single threaded workloads like Microsoft Office and Cinebench single thread, while Ryzen is substantially faster in most multi-threaded tests like CPU-based video encoding.
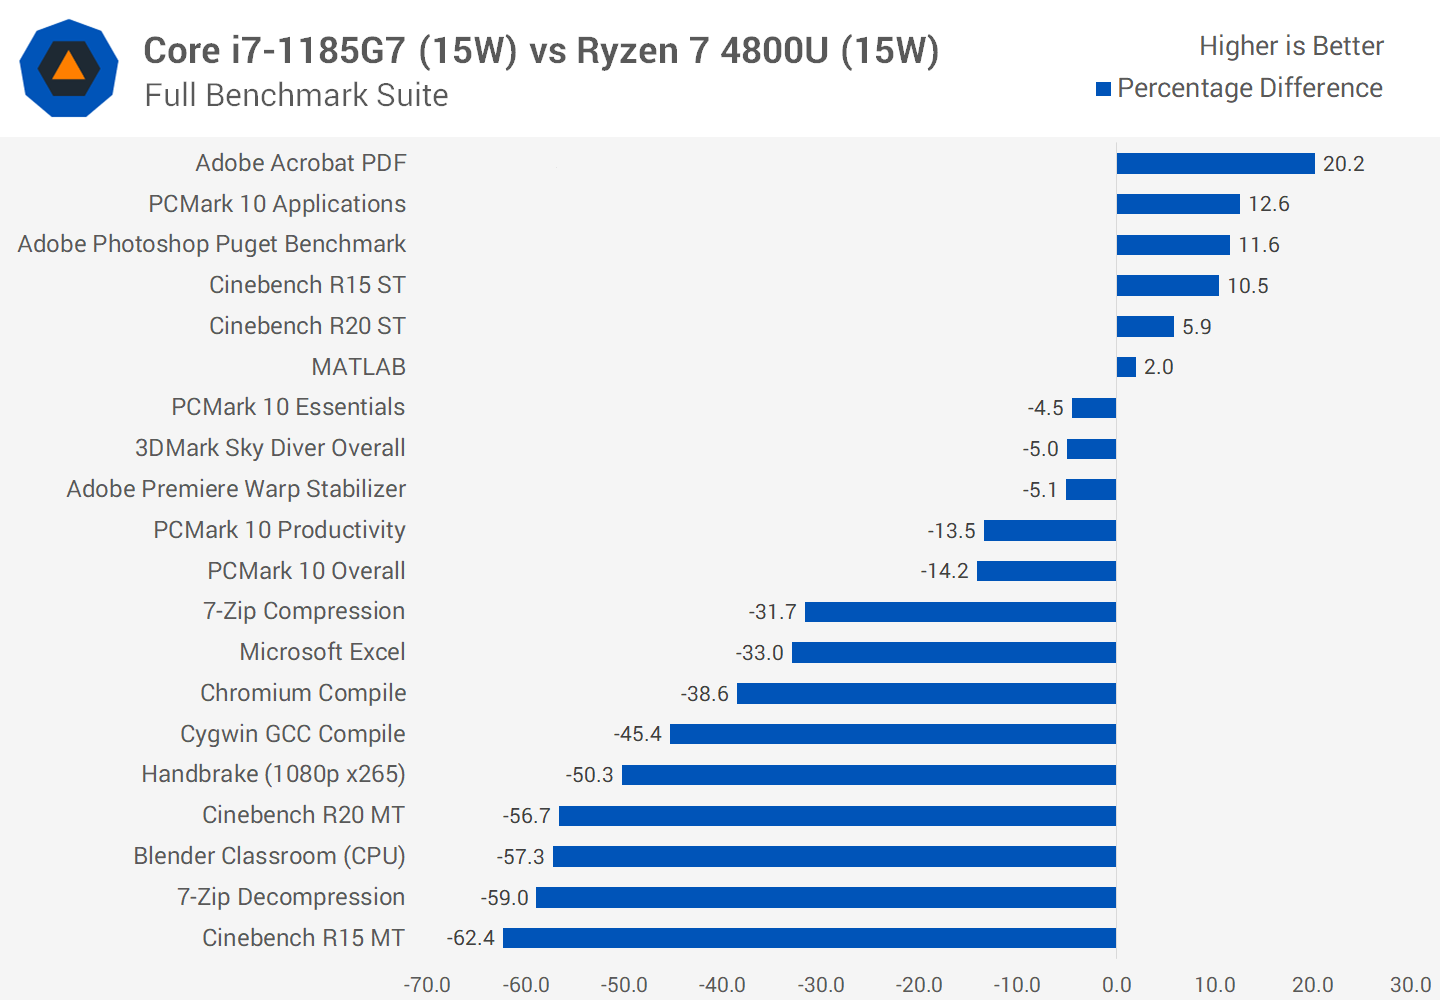
The margins are the slimmest at 28W, and grow more in favor of AMD at 15W, as AMD's design is more efficient and scales better down to lower power classes.
What We LearnedOverall the Intel Core i7-1185G7 is not a very exciting product, at least in comparison to the i7-1165G7 which we covered previously. The differences between these parts are minimal in terms of both specs and ultimately, performance. This makes the i7-1185G7 kind of pointless. If there were two laptops configurations available offering both chips, but the 1185G7 laptop was more expensive due to its higher tier processor, there is no way we'd recommend spending the extra cash on the flagship CPU because it offers very little tangible advantage.
Of course, if both laptop options were sold for the same price, by all means go with the 1185G7. If you were choosing an upgrade, other factors like build quality, battery life, display and other hardware are all far more important than getting an 1185G7 over 1165G7.
The narrow margins separating these two parts also makes it tricky for buyers to know exactly which laptop option will be faster in practice… for example, a premium Core i7-1165G7 model running at 28W will almost certainly be faster than a mid-range Core i7-1185G7 laptop that only goes up to 20W, despite the mid-range system having the "better" processor. This makes it very important to read reviews and do your research, as the naming and Tiger Lake SKU list will be of little help.
The flip side to this example is also possible, and that's the case with the MSI Stealth 15M. To differentiate this product, MSI have pushed the power limit up to 40W, making the 1185G7 in this system noticeably faster than the 1165G7. But it's critical to understand this comes down to a difference in power limits and cooling capacity, as opposed to the CPU itself. The Stealth 15M would likely have been just as good with the 1165G7 inside, so maybe MSI felt the need to include the 1185G7 to give this system a differentiating factor over other models. After all, this is one of few laptops we've seen with the 85G7 in it, almost every other premium Tiger Lake model has opted for the 65G7 instead, including Intel's own NUC reference design.
Bottom line, our thoughts about the 1165G7 also apply to the 1185G7. We think these high end Tiger Lake processors are well suited to everyday laptop users who primarily web browse, use office applications and might want to do some light gaming. Meanwhile, for heavy CPU processing work on the go, AMD provides more of an H-series like experience and are faster than 11th-gen options. It will take Intel an actual eight core design to compete, so we'll have to wait and see what happens there. We also have Zen 3 mobile chips on the way, which will heat up the mobile processor battle further. We’re certainly looking forward to see all that new technology in 2021. Shopping Shortcuts | ||||||||||||||||||||||||||||||||||||||||||||||||||||||||||||||||||||||||
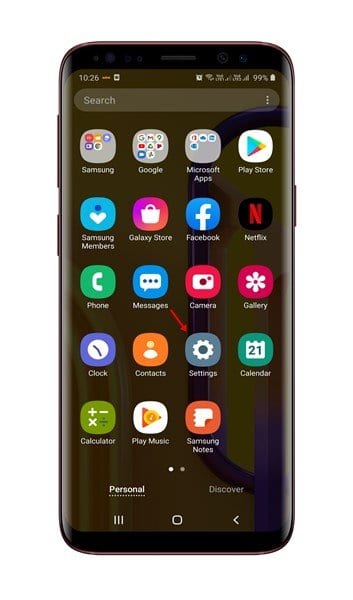
| How to Enable Focus Mode on Android to Avoid Distractions Posted: 20 Dec 2020 10:22 PM PST During the COVID-19 pandemic, WHO recommended users to avoid mass gatherings, close contacts, wearing masks, and work from home. The pandemic has left lots of people jobless, and they are now looking for an opportunity to work from home. The biggest problem that we all face while working from home is that there are more distractions than usual. Out of all those, smartphones seem to be the biggest distraction in our time. It doesn't matter whether you are about to prepare for a job interview or practicing Yoga. A single notification or marketing call can interrupt or divert you. For dealing with apps distraction, Google introduced a new 'Focus Mode' feature. The feature is a part of the Google Digital Wellbeing toolset, and it's available on every smart phone running on Android 10 and above. This article will share a detailed guide on how to use the Focus Mode feature in Android 10. Also Read: How to Capture Screenshots On Android using Google Assistant. Steps to Enable Focus Mode on Android to Avoid DistractionsNote: Since we have a Samsung device with us, we will show the tutorial for how to enable Focus mode on Samsung Devices. The steps might vary a little depending on your device. Just know the process, and you will be all set to enable the feature. Step 1. First of all, open Settings on your Android device.
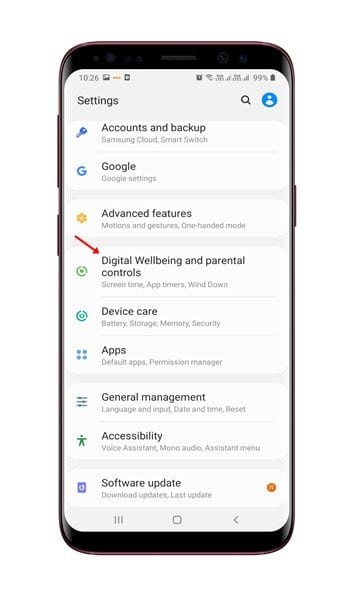
Step 2. On the Settings, scroll down and tap on the 'Digital WellBeing and parental controls' option.
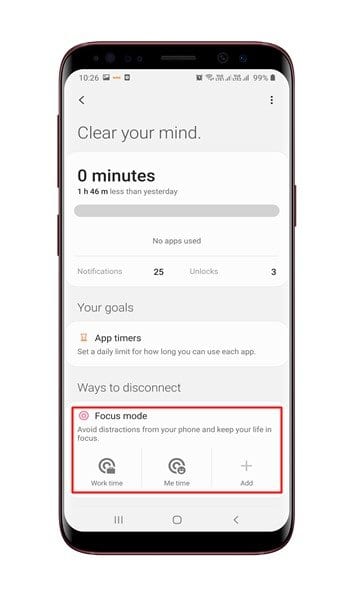
Step 3. On the Digital Wellbeing and parental controls, you will find lots of options. Just look at the 'Ways to disconnect' section.
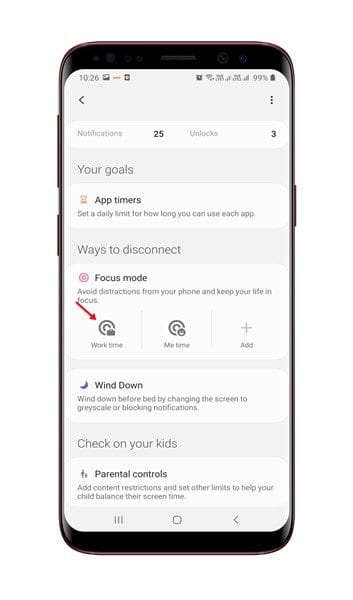
Step 4. On the 'Focus Mode' tap on the 'Work Time' or 'Me Time' option.
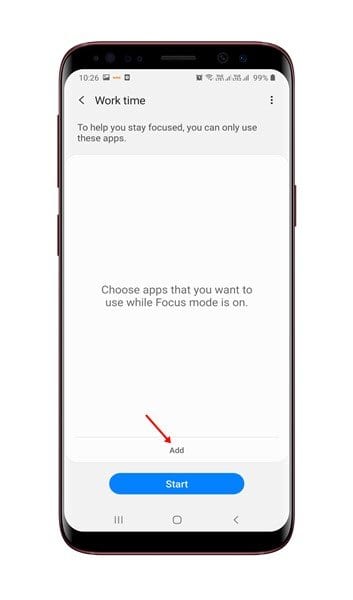
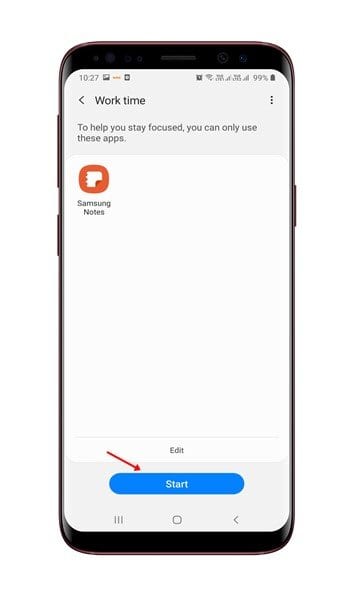
Step 5. Now select the apps that you want to use while Focus Mode is turned on. Remember that these are the apps that you can only use while the Focus Mode is on.
Step 6. After selecting the apps, tap on the 'Start' button.
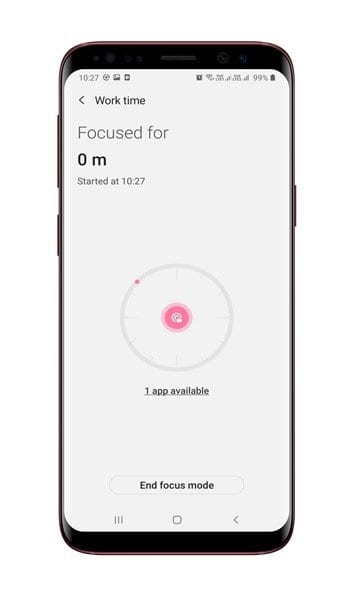
Step 7. You can create multiple modes and customize each one as per your wish. Step 8. To stop the Focus mode, tap on the 'End Focus Mode' button.
That's it! You are done. This is how you can enable Focus mode in the Android 10 operating system. If your phone is not running on Android 10, we recommend you check out the article – 5 Best Tools To Focus On Work at Home & Avoid Distractions. So, this article is all about how to use Digital Wellbeing Focus Mode on Android 10. I hope this article helped you! Please share it with your friends also. If you have any doubts related to this, let us know in the comment box below. | ||||||||||||||||||||||||||||||||||||||||||||||||||||||||||||||||||||||||
| 30 Best Android Hacking Apps and Tools in 2021 Posted: 20 Dec 2020 08:51 PM PST As we all know, hacking and pen testing were earlier possible only on computers. But now the world is changing. Now your mobile can be the small hacking toolkit. As with this, its security concerns also headed up. Hackers are now targeting Android users because it's an open-source operating system whose features can be controlled. One of the great advantages of Android is that the platform has apps for almost every different purpose. For instance, if you want to learn about security, then you can use Android hacking apps. There are hundreds of Android hacking apps available out there that can help you learn about hacking and security. In this article, we will share a list of the best Android hacking apps in 2021 that you can use right now. Hackers and security researchers widely use these apps to perform penetration testing and forensics via their Android smartphones. Also Read: Best Android Hacking Apps For Rooted & Non-Rooted List of 30 Best Android Hacking Apps and Tools in 2021Here are the latest and best Android hacking tools: 1. The Android Network Hacking Toolkit
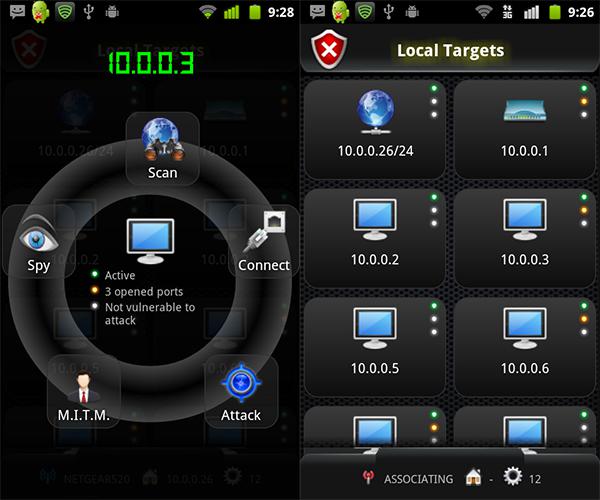
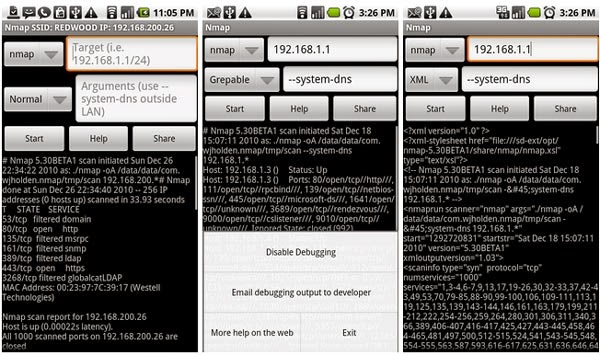
In the last Defcon conference, a new tool has been released by a security researcher, and the tool is called "The Android network toolkit." This tool has been developed for the penetration tester and ethical hackers to test any network and vulnerabilities by using their mobile phones. This toolkit contains different apps that will help any hacker to find vulnerabilities and possibly exploit them. The company behind the app is an Israeli security firm called Zimperium. 2. Nmap for Android
Nmap (network mapper) is one the best among different network scanner (port finder) tool. Nmap was initially developed for Unix OS, but now it is available on Windows and Android. Nmap for Android is a Nmap app for your phone! Once your scan finishes, you can e-mail the results. This application is not an official app, but it looks good. 3. FaceNiff: Session Hijacker for Android
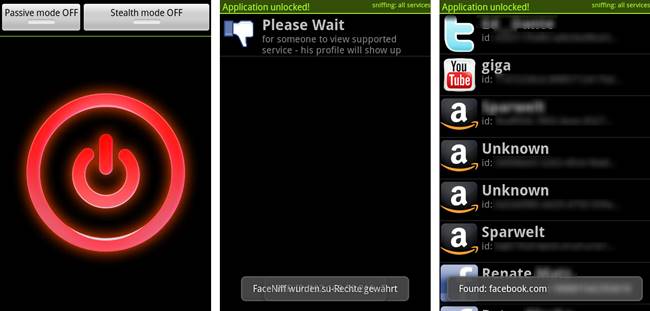
Your Facebook account is at risk. Just like a Firesheep (for Firefox hacking), there is a FaceNiff for hijacking the session of famous social networking websites includes Facebook and Twitter. FaceNiff is developed by Bartosz Ponurkiewicz, who created Firesheep before, but faceniff is for Android OS. 4. AnDOSid- DOS Tool for Android
DOS or denial of service attack is a very dangerous attack because it takes down the server (computer). AnDOSid allows security professionals to simulate a DOS attack (An HTTP post-flood attack to be exact) and, of course, a DDoS on a web server from mobile phones. AnDOSid is designed for security professionals only! 5. SSHDroid- Android Secure Shell
Secure Shell or SSH is the best protocol that provides an extra layer of security while connecting to your remote machine. SSHDroid is an SSH server implementation for Android. This application will let you connect to your device from a PC and execute commands (like "terminal" and "ADB shell"). 6. Hack Code
The best Hacker's Toolbox is an application for penetration tester, Ethical hackers, IT administrators, and Cybersecurity professionals to perform different tasks like reconnaissance, scanning, performing exploits, etc. This app contains different tools like Google Hacking, Google Dorks, Whois, Scanning, etc. 7. AndroRAT
AndroRAT – Remote Administration Tool for Android is a client/server application developed in Java, Android for the client-side, and Java/Swing for the Server. The application's goal is to control the Android system remotely and retrieve information from it. 8. SpoofApp
This app allows users to Spoof (Place) calls with any called ID number. You can manipulate what number shows up on the person's phone when you call. This is the app used for fun. It also includes several other features like a voice changer, and a calls recorder too. 9. WhatsApp Sniffer
WhatsApp Sniffer Android app allows Android users to receive text messages from WhatsApp application from phones that uses the same WiFi as you (WhatsApp is totally different from WhatsApp Sniffer). It is easily detected by antivirus, so it is better to disable it before using this app. 10. APK Inspector
It is the perfect GUI tool for analysts to analyze Android applications. You can use this app to get the source code of any Android app and edit it to remove licenses and credits. This app will help you a lot if you need to learn and understand the coding behind apps. 11. Evil Operator
As it, names suggest, it is an app that has lots of evil powers. This app's main purpose is to connect two people in a phone call, making them feel that they called each other. The best part is it can record and save the entire conversation. 12. WifiKill
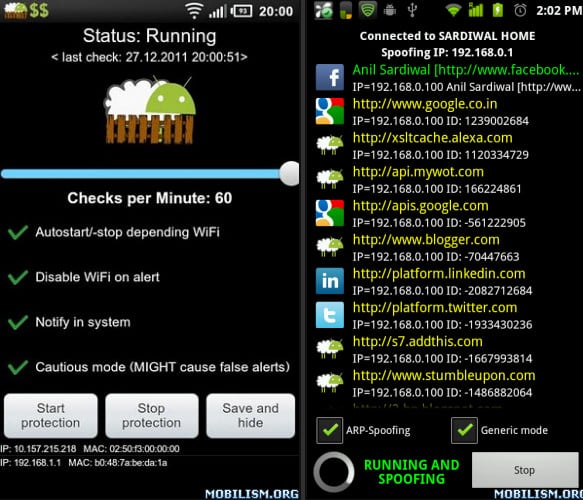
With this app, you can disable internet connection for a device on the same network. So if someone (anyone) is abusing the internet, wasting precious bandwidths, you could kill their connection and stay happy with a full bandwidth just for yourself. 13. DroidSheep
Droidsheep is developed as a tool for testing the security of your accounts. DroidSheep is an Android app for Security analysis in wireless networks and capturing Facebook, Twitter, LinkedIn, and other accounts. 14. Burp Suite
Burp Suite is an integrated platform for performing security testing of web applications. Its various tools work seamlessly together to support the entire testing process, from initial mapping and analysis of an application's attack surface to finding and exploiting security vulnerabilities. 15. dSploit
dSploit is an Android network analysis and penetration suite that aims to offer IT, security experts/geeks the most complete and advanced professional toolkit to perform network security assessments on a mobile device. 16. zANTI
zANTI is a mobile penetration testing toolkit that lets security managers assess the risk level with the push of a button. This easy to use mobile toolkit enables IT Security Administrators to simulate an advanced attacker to identify the malicious techniques they use in the wild to compromise the corporate network. 17. cSploit
cSploit is one of the advanced security tools which you can have on your Android operating system. cSploit is basically a complete collection of IT security tools that can be used on the Android platform. With this app, you can find vulnerabilities, exploits, and crack WiFi passwords, etc. 18. Shark for Root
This is another most used Android app for security experts and Hackers. Shark for Root basically works as a traffic snipper and also works on WiFi. FroYo, 3G tethered mode. With Shark for Root, you can also use tcpdump command on rooted Android devices. 19. DroidBox
This is another app that offers dynamic analysis of Android apps. If you need to find out the hashes for the APK package, DroidBox is the perfect app for you. You can also get results regarding network traffic, SMS and Phone calls, information leaks, and more using DroidBox. 20. SSHDroid
This is an SSH server implementation that is developed for Android. With the help of SSHdroid, you can connect your Android to the PC and run commands like adb shell, terminal, etc., to edit files. SSD droid basically provides an extra layer of security while connecting to a remote machine. 21. Kali Linux Hunter
Well, this is another best open-source penetration testing platform for Android devices. However, the app works on only Nexus and OnePlus devices. Kali Linux NetHunter serves penetrating purposes, and it has support for an HID keyboard, 1-click MANA Evil Access Point setups, Wireless 802.11 frame injection, and much more. 22. Network Scanner
Well, this is one of the popular Android app used for known devices that are connected to your network. The app helps users to identify devices connected to your wireless device. It also helps users discover security risks, find intruders, solve network problems, and much more. You don't need an expert level of knowledge to use the app. 23. USB Cleaver
This is another best Android hacking app that is used by a security researcher. The app can steal information from any connected Windows computer. Black hat hackers widely use the app to access passwords saved on the browser, WiFi passwords, network information, and much more. 24. Orbot
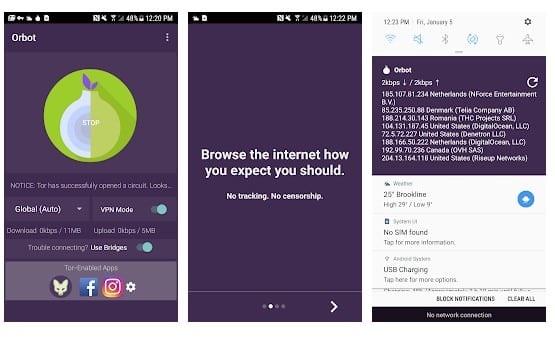
Well, Orbot is not actually an Android hacking app, but hackers widely use it. Basically, Orbot is an Android app that's developed for internet freedom and privacy. The app allows users to hide the real IP Address by bouncing the internet traffic around a distributed network of relays. So, it's another best Android app that is widely used by hackers and pentester. 25. Fing – Network Tools
Fing – Network Tools is one of the beats and top-rated wifi analyzer apps you can have right now. The best thing about Fing – Network Tools is that it runs on both rooted and non-rooted Android smartphones, and it can detect intruders, access network security risks, troubleshoot network problems. It's one of the widely used network toolkits. So, Fing – Network Tools is another best Android hacking tool that you can use today. 26. WPS Connect
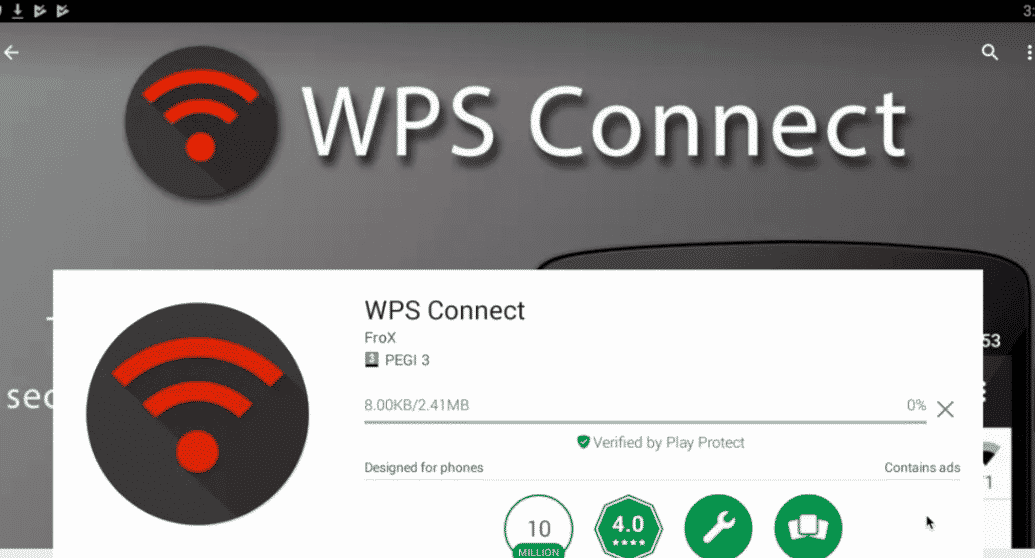
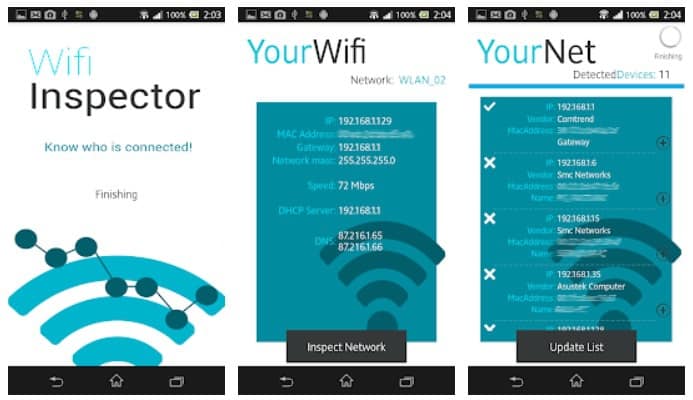
WPS Connect is for those who have been searching for the best free tool for scanning network vulnerabilities. The app works on a non-rooted device, and it's one of the best hacking tools you can use right now. It can show you the devices connected to your WiFi along with the IP Address, MAC Address, etc. 27. Wi-Fi inspect
If you are searching for the best free WiFi network analysis tool to detect the number of devices connected to a particular WIFi, then Wi-Fi inspects might be the best pick for you. Apart from detecting the devices connected to the WiFi, Wi-Fi inspections also allow users to block the devices to increase the internet speed. 28. Droid Pentest Update
Droid Pentest Update is one of the best Android security tools that are used by hackers. It basically brings lots of hacking tools in exactly one place. So, with the Droid Pentest Update, you can access different hacking tools to test the security protocols. So, the Droid Pentest Update is another best Android hacking app that you can use right now. 29. Droid Sheep
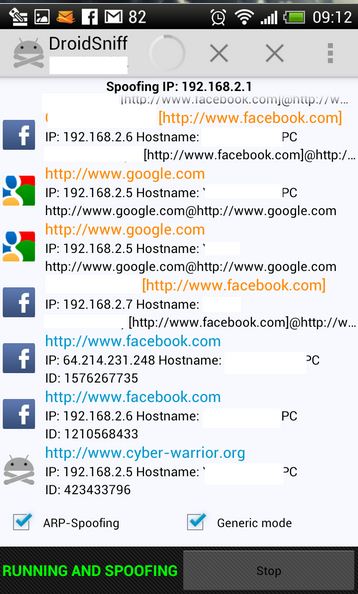
Droid Sheep is one of the popular and top-rated Android hacking app available on the Google Play Store. It's basically an Android app to audit your WiFi network for wireless security. The tool works only on rooted devices, and it can be used to analyze security in Wireless networks. 30. Droidsniff
Droidsniff is another best security analysis and wireless network that you can use on your Android smartphone. It works on both rooted and non-rooted devices, but it works the best on non-rooted Android smartphone. Security researchers widely use the app, and it's one of the best Android app to find security loopholes. This post is only for security or information purpose. However, as we already mentioned, our world is changing now, and your smartphone could be a small hacking toolkit. Must try all these best hacking apps or hacking tools. Share this post with your friends too! | ||||||||||||||||||||||||||||||||||||||||||||||||||||||||||||||||||||||||
| How to Easily Change Your Android Device’s Name Posted: 20 Dec 2020 06:01 PM PST Just like desktop computers & Laptops, when you purchase any new Android smartphone, they already have a name assigned. Android smartphone has a very generic name that mirrors the device itself. The phone's name helps you to identify your device when you connect with other devices. Sometimes, using the generic device name could be confusing. Let's say multiple people in your house have the same Galaxy S10 smartphone. When you connect your phone to your computer and scan for nearby devices, you will find multiple Galaxy S10 there. The same thing happens during Bluetooth connections as well. To deal with such problems, one needs to change their phone's name from the Settings Menu. Android provides you a quick and easy option to change your device's name. Also Read: How to Control Android Device With Your Eyes Steps to Easily Change Your Android Phone's NameIn this article, we will share a detailed guide on how to change your Android Phone's name. Let's check out. Step 1. First of all, pull the Notification shutter and click on the 'Settings' gear icon.
Step 2. This will open the Settings on your Android device.
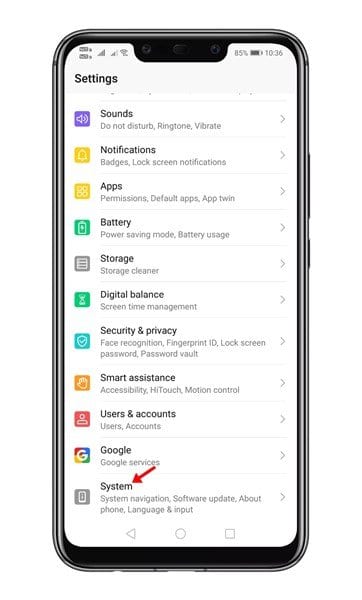
Step 3. Now scroll down and tap on the 'System' option.
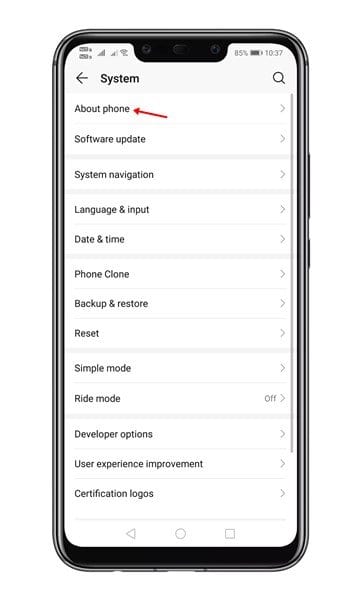
Step 4. On the next page, tap on the 'About Phone' option.
Step 5. Next, on the About Phone, tap the option 'Device Name'
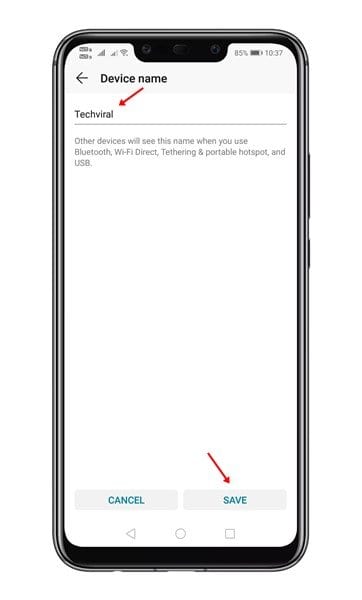
Step 6. Now you need to enter your new device name there.
Step 7. Once done, tap on the 'Save' button to assign a new name to your device. That's it! You are done. Now just restart your Android device to apply the changes. Just like Android, you can also change the Windows 10 device name. For a detailed guide, check out the article How to Change Your Computer Name in Windows 10. So, this is all about how to change your Android Phone's name in 2021. I hope this article helped you! Please share it with your friends also. If you have any doubts related to this, let us know in the comment box below. | ||||||||||||||||||||||||||||||||||||||||||||||||||||||||||||||||||||||||


| You are subscribed to email updates from My Blog. To stop receiving these emails, you may unsubscribe now. | Email delivery powered by Google |
| Google, 1600 Amphitheatre Parkway, Mountain View, CA 94043, United States | |


0 nhận xét:
Đăng nhận xét